IDEA StatiCa Detail – Structural design of concrete discontinuities
The theoretical background is based on COMPATIBLE STRESS FIELD DESIGN OF STRUCTURAL CONCRETE
(Kaufmann et al., 2020)
Structural design of concrete discontinuities in IDEA StatiCa Detail
Introduction to the CSFM method
General introduction for the structural design of concrete details
Main assumptions and limitations
Design tools for reinforcement
Analysis model of IDEA StatiCa Detail
Introduction to finite element implementation
Supports and load transmitting components
Load transfer at trimmed ends of beams
Geometric modification of cross-sections
Finite element types
Meshing
Solution method and load-control algorithm
Presentation of results
Model verification
Limit states, crack width calculation, and Tension stiffening
Structural verifications according to EUROCODE
- Material models (EN)
- Safety factors
- Ultimate limit state analysis
- Partially loaded areas (PLA)
- Serviceability limit state analysis
Structural verifications according to ACI 318-19
- Material models (ACI)
- Strength reduction and load factors
- Strength verifications
- Bearing and anchorage zones - Partially loaded areas
- Serviceability verifications
Structural verifications according to AS 3600
- Material models (AUS)
- Stress reduction and load factors
- Strength and anchorage verifications
- Serviceability checks
Prestressing in Detail - Model description
Introduction to the CSFM method
Introduzione generale per la progettazione strutturale di dettagli in calcestruzzo
La progettazione e la valutazione degli elementi in calcestruzzo vengono normalmente eseguite a livello di sezione (elemento 1D) o puntuale (elemento 2D). Questa procedura è descritta in tutte le norme per la progettazione strutturale, ad esempio in (EN 1992-1-1 o ACI 318-19), ed è utilizzata nella pratica quotidiana dell'ingegneria strutturale. Tuttavia, non è sempre noto o rispettato che la procedura è accettabile solo nelle aree in cui si applica l'ipotesi di Bernoulli-Navier della distribuzione piana delle deformazioni (le cosiddette regioni B). I luoghi in cui questa ipotesi non è applicabile sono chiamati regioni di discontinuità o disturbate (D-Regions). Esempi di regioni B e D di elementi 1D sono forniti in (Fig. 1). Si tratta, ad esempio, di aree portanti, parti in cui vengono applicati carichi concentrati, luoghi in cui si verifica un brusco cambiamento nella sezione trasversale, aperture, ecc. Quando progettiamo strutture in calcestruzzo, incontriamo molte altre regioni D come muri, ponti diaframmi, mensole, ecc.
\[ \textsf{\textit{\footnotesize{Fig. 1\qquad Discontinuity regions (Navrátil et al. 2017)}}}\]
In passato, per il dimensionamento delle regioni di discontinuità si utilizzavano regole di progettazione semi-empiriche. Fortunatamente, negli ultimi decenni queste regole sono state ampiamente superate dai modelli tirante-puntone (Schlaich et al., 1987) e dai campi di sollecitazione (Marti 1985), che sono presenti negli attuali codici di progettazione e che oggi sono frequentemente utilizzati dai progettisti. Questi modelli sono strumenti meccanicamente coerenti e potenti. Si noti che i campi di sollecitazione possono essere generalmente continui o discontinui e che i modelli tirante-puntone sono un caso particolare di campi di sollecitazione discontinui.
Nonostante l'evoluzione degli strumenti di calcolo negli ultimi decenni, i modelli Strut-and-Tie sono essenzialmente ancora utilizzati come calcoli manuali. La loro applicazione a strutture reali è noiosa e richiede molto tempo, poiché sono necessarie iterazioni e si devono considerare diversi casi di carico. Inoltre, questo metodo non è adatto per la verifica dei criteri di esercizio (deformazioni, ampiezza delle fessure, ecc.).
L'interesse degli ingegneri strutturali per uno strumento affidabile e veloce per la progettazione delle regioni D ha portato alla decisione di sviluppare il nuovo Compatible Stress Field Method, un metodo per la progettazione assistita da computer dei campi di sollecitazione che consente di progettare e valutare automaticamente le membrature strutturali in calcestruzzo soggette a carichi nel piano.
Il Compatible Stress Field Method (CSFM) è un metodo di analisi del campo di sollecitazione continuo basato sugli elementi finiti, in cui le soluzioni classiche del campo di sollecitazione sono integrate da considerazioni cinematiche, cioè lo stato di deformazione è valutato in tutta la struttura. Pertanto, la resistenza effettiva a compressione del calcestruzzo può essere calcolata automaticamente in base allo stato di deformazione trasversale, in modo simile a quanto avviene nelle analisi in campo di compressione che tengono conto del compression softening (Vecchio e Collins 1986; Kaufmann e Marti 1998) e nel metodo EPSF (Fernández Ruiz e Muttoni 2007). Inoltre, il CSFM considera il tension stiffening, fornendo rigidezze realistiche agli elementi e copre tutte le prescrizioni del codice di progettazione (compresi gli aspetti di esercizio e capacità di deformazione) non affrontate in modo coerente dagli approcci precedenti. Il CSFM utilizza leggi costitutive uniassiali comuni fornite dalle norme di progettazione per il calcestruzzo e le armature. Queste sono note in fase di progettazione, il che consente di utilizzare il metodo del coefficiente di sicurezza parziale. In questo modo, i progettisti non devono fornire ulteriori proprietà dei materiali, spesso arbitrarie, come invece è richiesto dalle analisi FE non lineari, rendendo il metodo perfettamente adatto alla pratica ingegneristica.
Per promuovere l'uso dei campi di sollecitazione assistiti dal computer da parte degli ingegneri strutturali, questi metodi dovrebbero essere implementati in ambienti software di facile utilizzo. A tal fine, il CSFM è stato implementato in IDEA StatiCa Detail, un nuovo software commerciale di facile utilizzo sviluppato congiuntamente dal Politecnico di Zurigo e dalla società di software IDEA StatiCa nell'ambito del progetto DR-Design Eurostars-10571.
Main assumptions and limitations for CSFM
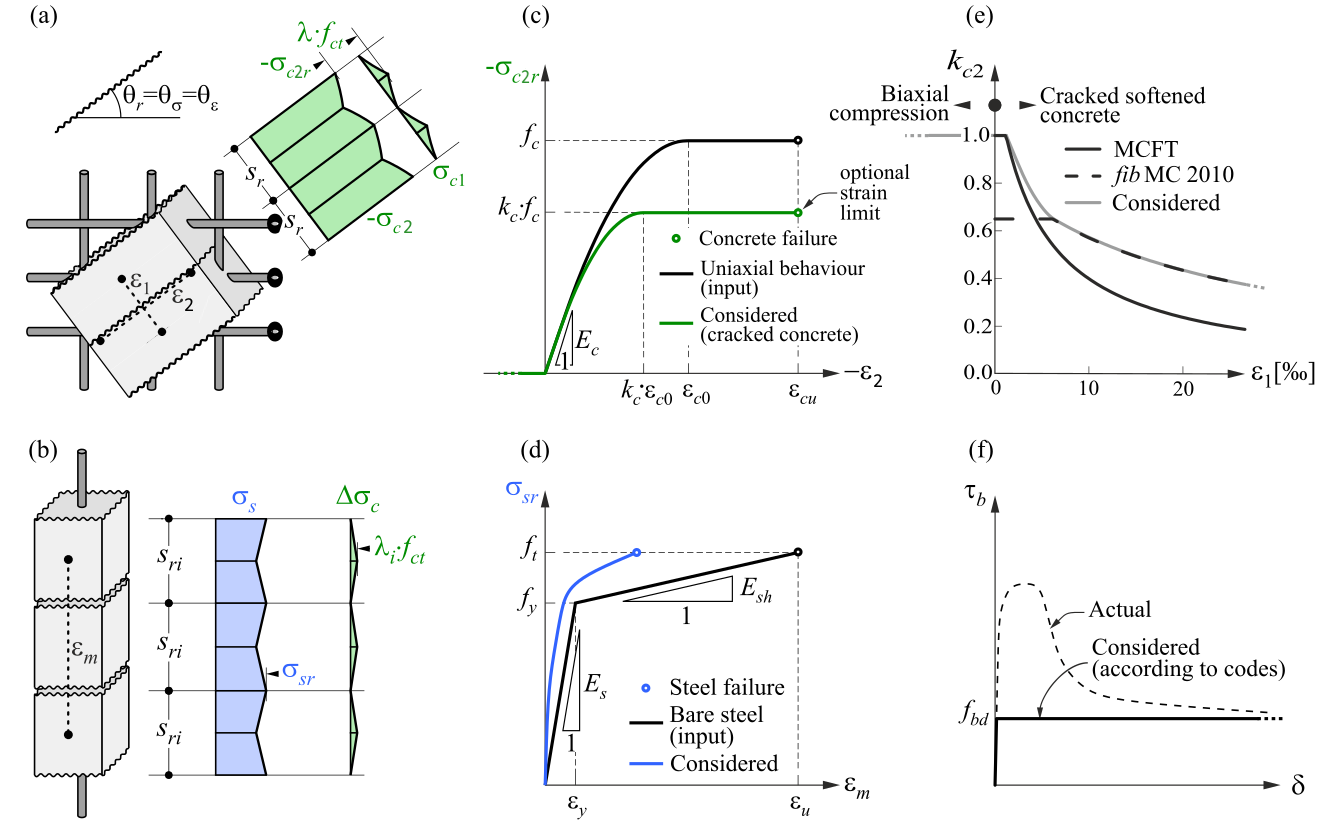
CSFM considers maximum principal concrete stress in compression (σc2r) and reinforcement stresses (σsr) at the cracks while neglecting the concrete tensile strength (σc1r = 0), except for its stiffening effect on the reinforcement. The consideration of tension stiffening allows the average reinforcement strains (εm) to be simulated. Fictitious, rotating, stress-free cracks that open without slip (Fig. 2a) are considered and the equilibrium at the cracks together with the average strains of the reinforcement is also taken into account.
\( \textsf{\textit{\footnotesize{Fig. 2\qquad Basic assumptions of the CSFM: (a) principal stresses in concrete; (b) stresses in the reinforcement direction;}}}\) \( \textsf{\textit{\footnotesize{(c) stress-strain diagram of concrete in terms of maximum stresses with consideration of compression softening;}}}\) \( \textsf{\textit{\footnotesize{(d) stress-strain diagram of reinforcement in terms of stresses at cracks and average strains; (e) compression softening}}}\) \( \textsf{\textit{\footnotesize{law; (f) bond shear stress-slip relationship for anchorage length verifications.}}}\)
Despite their simplicity, similar assumptions have been demonstrated to yield accurate predictions for reinforced members subjected to in-plane loading (Kaufmann 1998; Kaufmann and Marti 1998) if the provided reinforcement avoids brittle failures at cracking. Furthermore, the non-consideration of any contribution of the tensile strength of concrete to the ultimate load is consistent with the principles of modern design codes, which are mostly based on plasticity theory.
However, the CSFM is not suited for slender elements without transverse reinforcement since relevant mechanisms for such elements as aggregate interlock, residual tensile stresses at the crack tip, and dowel action – all of them relying directly or indirectly on the tensile strength of the concrete – are disregarded. While some design standards allow the design of such elements based on semi-empirical provisions, the CSFM is not intended for this type of potentially brittle structure.
Concrete
The concrete model implemented in the CSFM is based on the uniaxial compression constitutive laws prescribed by design codes for the design of cross-sections, which only depend on compressive strength. The parabola-rectangle diagram (Fig. 2c) is used by default in the CSFM, but designers can also choose a more simplified elastic ideal plastic relationship. When assessing according to the ACI code, it is possible to use only the parabola-rectangle stress-strain diagram. As previously mentioned, the tensile strength is neglected, as it is in classic reinforced concrete design.
The effective compressive strength is automatically evaluated for cracked concrete based on the principal tensile strain (ε1) by means of the kc2 reduction factor, as shown in Fig. 2c and e. The implemented reduction relationship (Fig. 2e) is a generalization of the fib Model Code 2010 proposal for shear verifications, which contains a limiting value of 0.65 for the maximum ratio of effective concrete strength to concrete compressive strength, which is not applicable to other loading cases.
The CSFM in IDEA StatiCa Detail does not consider an explicit failure criterion in terms of strains for concrete in compression (i.e., it considers an infinitely plastic branch after the peak stress is reached). This simplification does not allow the deformation capacity of structures failing in compression to be verified. However, their ultimate capacity is properly predicted when, in addition to the factor of cracked concrete (kc2) defined in (Fig. 2e), the increase in the brittleness of concrete as its strength rises is considered by means of the \( \eta_{fc} \) reduction factor defined in fib Model Code 2010 as follows:
\[f_{c,red} = k_c \cdot f_{c} = \eta _{fc} \cdot k_{c2} \cdot f_{c}\]
\[{\eta _{fc}} = {\left( {\frac{{30}}{{{f_{c}}}}} \right)^{\frac{1}{3}}} \le 1\]
where:
kc is the global reduction factor of the compressive strength
kc2 is the reduction factor due to the presence of transverse cracking
fc is the concrete cylinder characteristic strength (in MPa for the definition of \( \eta_{fc} \)).
There is also a reduction of the kc2 factor because of the stability of the calculation. This reduction doesn't influence the total strength of members. Assuming fcd value as the factored strength of concrete (design value), the kc2 value is reduced according to the following rules.
σc2r < 0.11fcd kc2=1.0
0.11fcd < σc2r < 0.37fcd kc2 is a linear interpolation between 1.0 and the value taken from the
graph displayed in Fig. 2f
σc2r > 0.37fcd kc2 is directly taken from the graph from Fig. 2f
Reinforcement
The idealized bilinear stress-strain diagram for the bare reinforcing bars typically defined by design codes (Fig. 2d) is considered. The definition of this diagram only requires the basic properties of the reinforcement to be known during the design phase (strength and ductility class). A user-defined stress-strain relationship can also be defined.
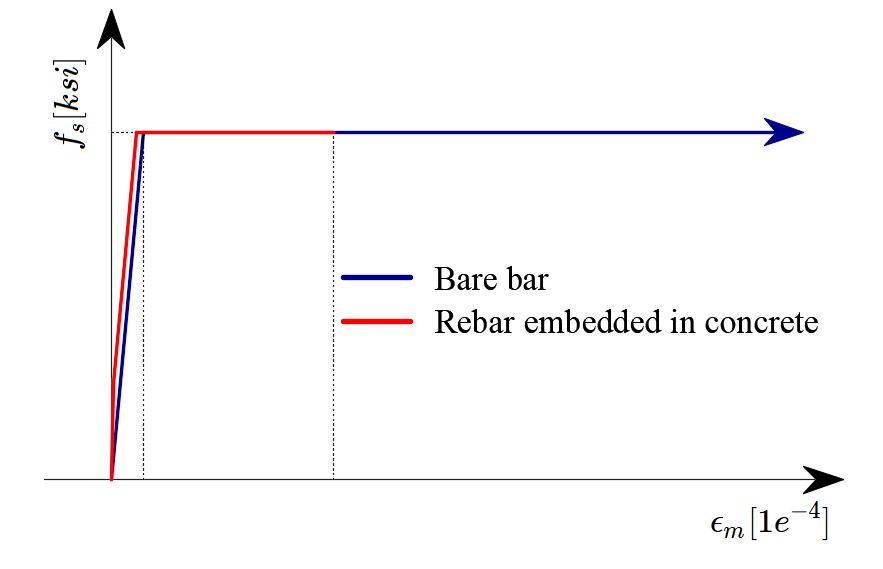
Tension stiffening is accounted for by modifying the input stress-strain relationship of the bare reinforcing bar in order to capture the average stiffness of the bars embedded in the concrete (εm).
Bond model
Bond-slip between reinforcement and concrete is introduced in the finite element model by considering the simplified rigid-perfectly plastic constitutive relationship presented in Fig. 2f, with fbd being the design value (factored value) of the ultimate bond stress specified by the design code for the specific bond conditions.
This is a simplified model with the sole purpose of verifying bond prescriptions according to design codes (i.e., anchorage of reinforcement). The reduction of the anchorage length when using hooks, loops, and similar bar shapes can be considered by defining a certain capacity at the end of the reinforcement, as will be described further.
Strumenti di progettazione per l'armatura
Flusso di lavoro e obiettivi
L'obiettivo degli strumenti di progettazione delle armature nel CSFM è quello di aiutare i progettisti a determinare in modo efficiente la posizione e la quantità necessaria di barre di armatura. Per aiutare e guidare l'utente in questo processo sono disponibili i seguenti strumenti: calcolo lineare e ottimizzazione topologica.
Gli strumenti di progettazione delle armature considerano modelli costitutivi più semplificati rispetto ai modelli utilizzati per la verifica finale della struttura. Pertanto, la definizione delle armature in questa fase deve essere considerata una pre-progettazione da confermare/raffinare durante la fase di verifica finale. L'uso dei diversi strumenti di progettazione delle armature sarà illustrato nel modello mostrato nella Fig. 3, che consiste in un'estremità di una trave semplicemente appoggiata con altezza variabile soggetta a un carico uniformemente distribuito.
\[ \textsf{\textit{\footnotesize{Fig. 3\qquad Modello utilizzato per illustrare l'uso degli strumenti di progettazione delle armature.}}}\]
Analisi lineare
L'analisi lineare considera le proprietà elastiche lineari del materiale e trascura l'armatura nella regione del calcestruzzo. Si tratta quindi di un calcolo molto veloce che fornisce una prima idea della posizione delle aree di trazione e compressione. Un esempio di tale calcolo è mostrato nella Fig. 4.
\[ \textsf{\textit{\footnotesize{Fig. 4\qquad Risultati dello strumento di analisi lineare per la definizione della disposizione dell'armatura}}}\]
\[ \textsf{\textit{\footnotesize{(rosso: aree in compressione, blu: aree in trazione).}}}\]
Ottimizzazione della topologia
L'ottimizzazione topologica è un metodo che mira a trovare la distribuzione ottimale del materiale in un determinato volume per una certa configurazione di carico. L'ottimizzazione topologica implementata in IDEA StatiCa Detail utilizza un modello lineare a elementi finiti. Ogni elemento finito può avere una densità relativa da 0 a 100 %, che rappresenta la quantità relativa di materiale utilizzato. Queste densità di elementi sono i parametri di ottimizzazione del problema di ottimizzazione. La distribuzione del materiale risultante è considerata ottimale per l'insieme di carichi dato se minimizza l'energia di deformazione totale del sistema. Per definizione, la distribuzione ottimale è anche la geometria che presenta la maggiore rigidezza possibile per i carichi dati.
Il processo di ottimizzazione iterativa inizia con una distribuzione omogenea della densità. Il calcolo viene eseguito per diverse frazioni di volume totale (20%, 40%, 60% e 80%), il che consente all'utente di scegliere il risultato più pratico. La forma risultante è costituita da tralicci reticolari con puntoni e tiranti e rappresenta la forma ottimale per i casi di carico indicati (Fig. 5).
\[ \textsf{\textit{\footnotesize{Fig. 5\qquad Risultati dello strumento di progettazione per l'ottimizzazione della topologia con volume effettivo del 20 e del 40}}}\]
\[ \textsf{\textit{\footnotesize{(rosso: aree in compressione, blu: aree in trazione).}}}\]
Analysis model of IDEA StatiCa Detail
Introduction to finite element implementation
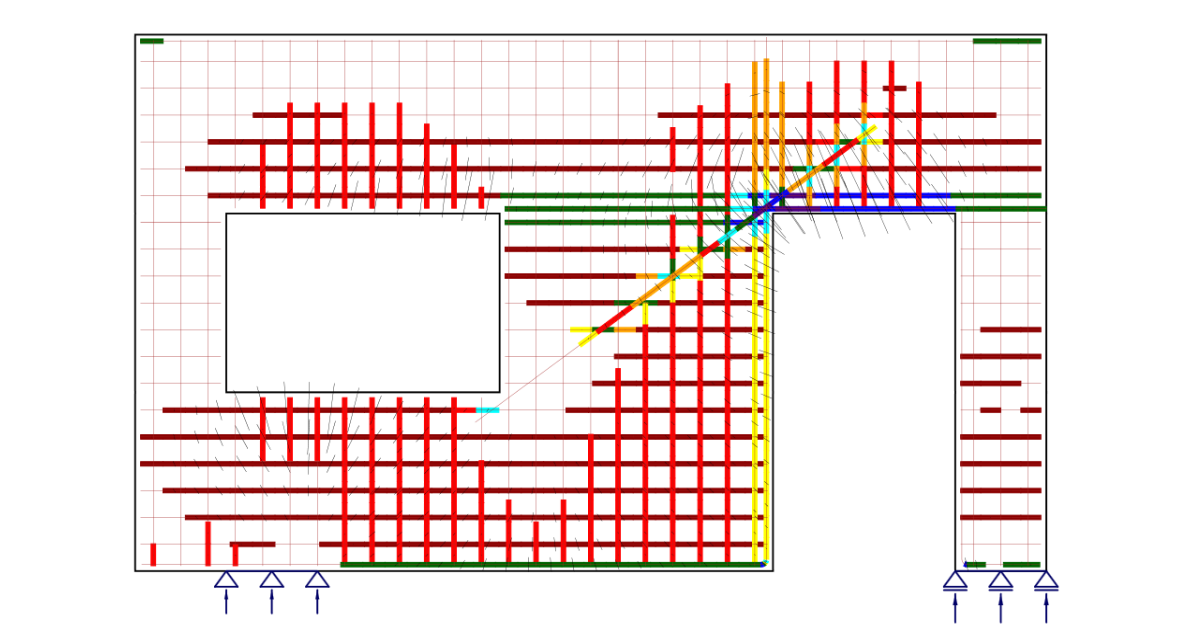
The CSFM considers continuous stress fields in the concrete (2D finite elements), complemented by discrete “rod” elements representing the reinforcement (1D finite elements). Therefore, the reinforcement is not diffusely embedded into the concrete 2D finite elements but explicitly modeled and connected to them. A plane stress state is considered in the calculation model.
\[ \textsf{\textit{\footnotesize{Fig. 6\qquad Visualization of the calculation model of a structural element (trimmed beam) in Idea StatiCa Detail.}}}\]
Both entire walls and beams, as well as details (parts) of beams (isolated discontinuity region, also called trimmed end), can be modeled. In the case of walls and entire beams, supports must be defined in such a way that an (externally) isostatic (statically determinate) or hyperstatic (statically indeterminate) structure results. The load transfer at the trimmed ends of beams is introduced by means of a special Saint-Venant transfer zone, which ensures a realistic stress distribution in the analyzed detail region.
Supports and load transmitting components
To model most of the situations during the construction process, many types of supports (Fig. 7) and components used for transferring load (Fig. 8) are available in the CSFM.
Supports
Point support can be modeled in several ways to ensure that stresses are not localized in one point but rather distributed over a larger area. The first option is a distributed point support (Fig. 7a), which uniformly distributes the load on the edge of the member over the specified width.
\[ \textsf{\textit{\footnotesize{Fig. 7\qquad Various types of supports:}}}\]
\[ \textsf{\textit{\footnotesize{(a) point distributed; (b) bearing plate; (c) line support; (d) patch support; (e) hanging.}}}\]
Patch support (Fig. 7d), on the other hand, can only be placed inside a volume of concrete with a defined effective radius. It is then connected by rigid elements to the nodes of the reinforcement mesh within this radius. Therefore, it is required to define a reinforcing cage around patch support.
For the more precise modeling of some real scenarios, there are two other options for point support. Firstly, there is point support with a bearing plate of defined width and thickness (Fig. 7b). The material of the bearing plate can be specified, and the whole bearing plate is meshed independently. Secondly, there is hanging support available (Fig. 7e), which can be used for modeling lifting anchors or lifting studs.
Line support (Fig. 7c) can be defined on an edge (by specifying its length) or inside an element (by a polyline). It is also possible to specify its stiffness and/or non-linear behavior (support in compression/tension or only in compression).
- Read detailed descriptions in Types of supports in IDEA StatiCa Detail
Load transmitting components
The introduction of loads into the structure can also be modeled in several ways. For point loads, a bearing plate (Fig. 8a) can be used similarly as point support, distributing the concentrated load onto a larger area thanks to a steel plate with defined width and thickness.
\[ \textsf{\textit{\footnotesize{Fig. 8\qquad Various types of load transfer components:}}}\]
\[ \textsf{\textit{\footnotesize{(a) bearing plate; (b) patch load; (c) hanging; (d) partially loaded area.}}}\]
The point load can be applied either directly to the surface of the structure with a defined radius of action (load is applied to the concrete elements) or via a special transmitting device called patch load (Fig. 8b and Fig. 9). Patch load allows transmitting the load directly to the defined reinforcement located within the area of the effective radius. To secure the correct functionality of the patch load, a group of rebars that will be interconnected with the load is necessary to define (in the reinforcement properties). When the interconnected reinforcement is not defined, the load transfer mechanism is the same as for the point load placed on a member surface, and the load is transferred by the constraints to the concrete elements, not directly to the reinforcement.
\[ \textsf{\textit{\footnotesize{Fig. 9\qquad Patch load: (a) load application; (b) load transferred through rebars (a group of bars for the load transfer is defined);}}}\]
\[ \textsf{\textit{\footnotesize{(c) load transferred through concrete (a group of bars for the load transfer is not defined).}}}\]
Lifting anchors or lifting studs can be modeled by a hanging load (Fig. 8c). User can use a partially loaded area (Fig. 8d), which allows for increasing the load-bearing capacity of concrete in compression according to Eurocode (it is not possible to use this type of load transmitting component when ACI is set). The structure can also be loaded with line loads on the edges, by general polyline, or by surface loads. The Detail application is able to automatically consider a self-weight in the analysis.
Load transfer at trimmed ends of beams
In many cases, we need to model only some detail (part) of a structural member, such as beam support, opening in the middle of the beam, etc. This approach can lead to support configurations that are unstable but admissible in IDEA StatiCa Detail (including the case of no supports). However, in such cases, it is also necessary to model the section representing the connection to the adjoining B-region, including internal forces at this section that satisfy the equilibrium. In certain cases (e.g., when modeling beam support), these internal forces can be determined automatically by the program.
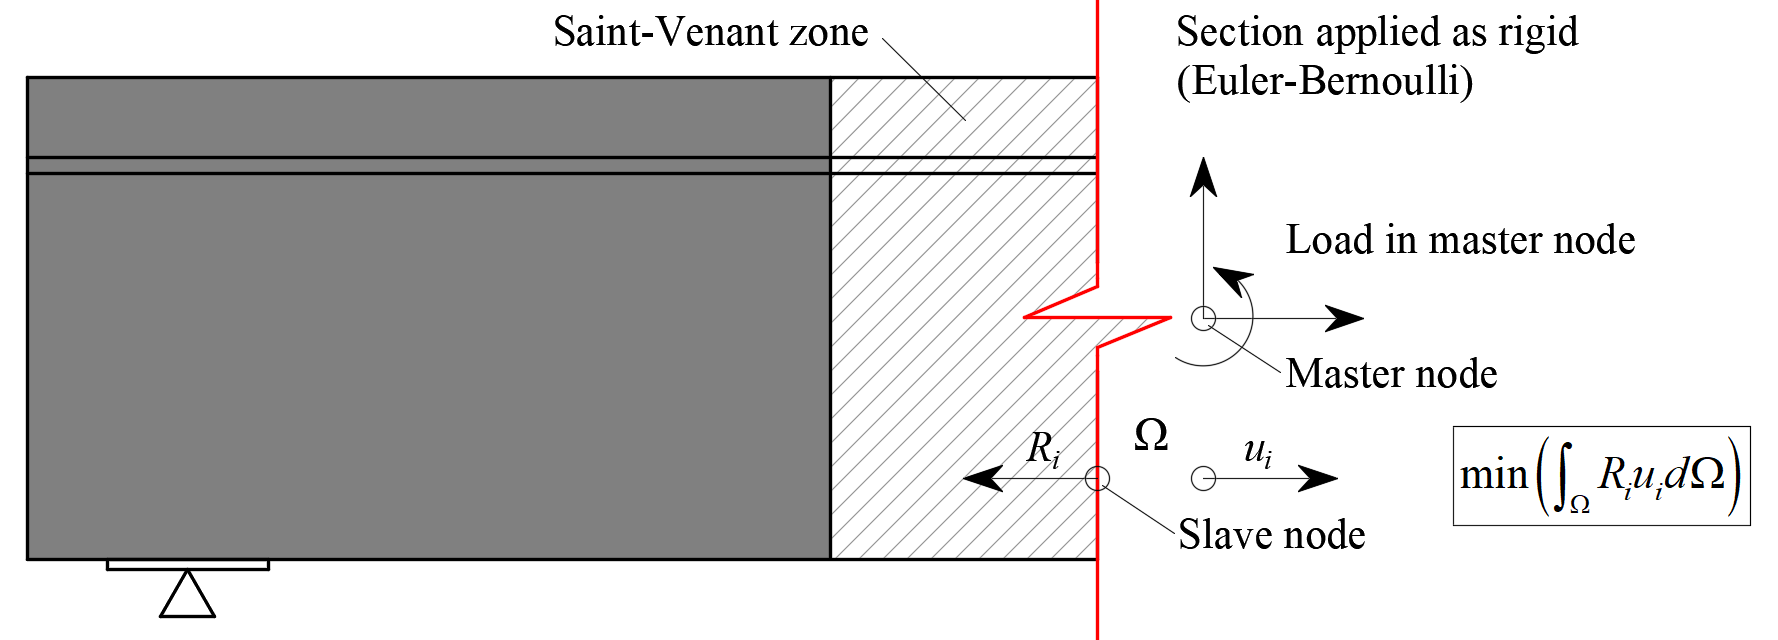
Between the B-region and the analyzed discontinuity region, a Saint-Venant transfer zone is automatically created to ensure a realistic stress distribution in the analyzed region. The width of the transfer zone is determined as half of the section’s depth. As the only purpose of the Saint-Venant zone is to achieve a proper stress distribution in the rest of the model, no results from this area are displayed in verification, and no stop criteria are considered here.
The edge of the Saint-Venant zone that represents the trimmed end of the beam is modeled as rigid, i.e., it may rotate but must rest plane. This is done by connecting all the FEM nodes of the edge to a separate node at the centre of inertia of the section using a rigid body element (RBE2). The internal forces of the element may then be applied at this node, as shown in Fig. 10.
\[ \textsf{\textit{\footnotesize{Fig. 10\qquad Transfer of internal forces at a trimmed end.}}}\]
Geometric modification of cross-sections
Reduction of the cross-section is automatically performed for structures defined as a beam or frame joint (defined by the x-axis and a cross-section). This modification is automatically applied on cross-sections with very wide flanges (Fig. 11) and is based on the assumption that a compression stress field would expand from the wall at a 45° angle, so the aforementioned reduced width would be the maximum width capable of transferring loads
Note that the method of determining the effective width flange implemented in CSFM is different from the one stated in 5.3.2.1 EN 1992-1-1 (2015) or in 9.2.4.4 ACI 318-19. Besides geometry, Eurocode-based effective width flange is explicitly affected by the span lengths and boundary conditions of a structure.
\[ \textsf{\textit{\footnotesize{Fig. 11\qquad Width reduction of a cross-section: (a) user input; (b) FE model – automatically determined reduced flange width.}}}\]
In the case of haunches lying in the horizontal plane (Fig. 12), each haunch is divided into five sections along its length. Each of these sections is then modeled as a wall with a constant thickness, which is equal to the real thickness in the middle of the respective section.
\[ \textsf{\textit{\footnotesize{Fig. 12\qquad Horizontal haunch: (a) user input; (b) FE model – a haunch automatically divided into five sections.}}}\]
Finite element types
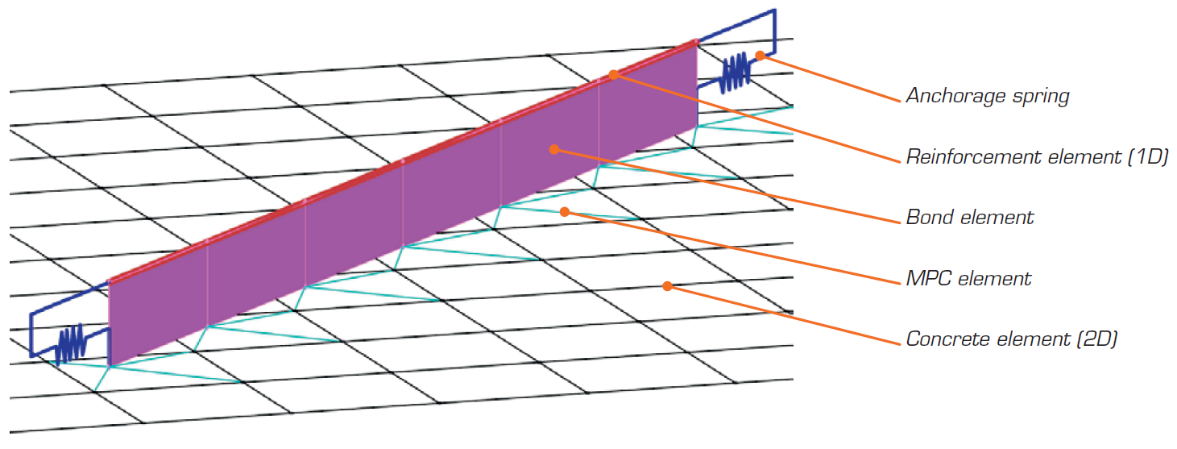
The non-linear (inelastic) finite element analysis model is created by several types of finite elements used to model concrete, reinforcement, and the bond between them. Concrete and reinforcement elements are first meshed independently and then connected to each other using multi-point constraints (MPC elements). This allows the reinforcement to occupy an arbitrary, relative position in relation to the concrete. If anchorage length verification is to be calculated, bond and anchorage end spring elements are inserted between the reinforcement and the MPC elements.
\[ \textsf{\textit{\footnotesize{Fig. 13\qquad Finite element model: reinforcement elements mapped to concrete mesh using MPC elements and bond elements.}}}\]
Concrete
Concrete is modeled using quadrilateral and trilateral shell elements, CQUAD4 and CTRIA3. These can be defined by four or three nodes, respectively. Only plane stress is assumed to exist in these elements, i.e., stresses or strains in the z-direction are not considered.
Each element has four or three integration points which are placed at approximately 1/4 of its size. At each integration point in every element, the directions of principal strains α1, α2 are calculated. In both of these directions, the principal stresses σc1, σc2 and stiffnesses E1, E2 are evaluated according to the specified concrete stress-strain diagram, as per Fig. 2. It should be noted that the impact of the compression softening effect couples the behavior of the main compressive direction to the actual state of the other principal direction.
Reinforcement
Rebars are modeled by two-node 1D “rod” elements (CROD), which only have axial stiffness. These elements are connected to special “bond” elements which were developed in order to model the slip behavior between a reinforcing bar and the surrounding concrete. These bond elements are subsequently connected by MPC (multi-point constraint) elements to the mesh representing the concrete. This approach allows the independent meshing of reinforcement and concrete, while their interconnection is ensured later.
Bond elements
The anchorage length is verified by implementing the bond shear stresses between concrete elements (2D) and reinforcing bar elements (1D) in the finite element model. To this end, a “bond” finite element type was developed.
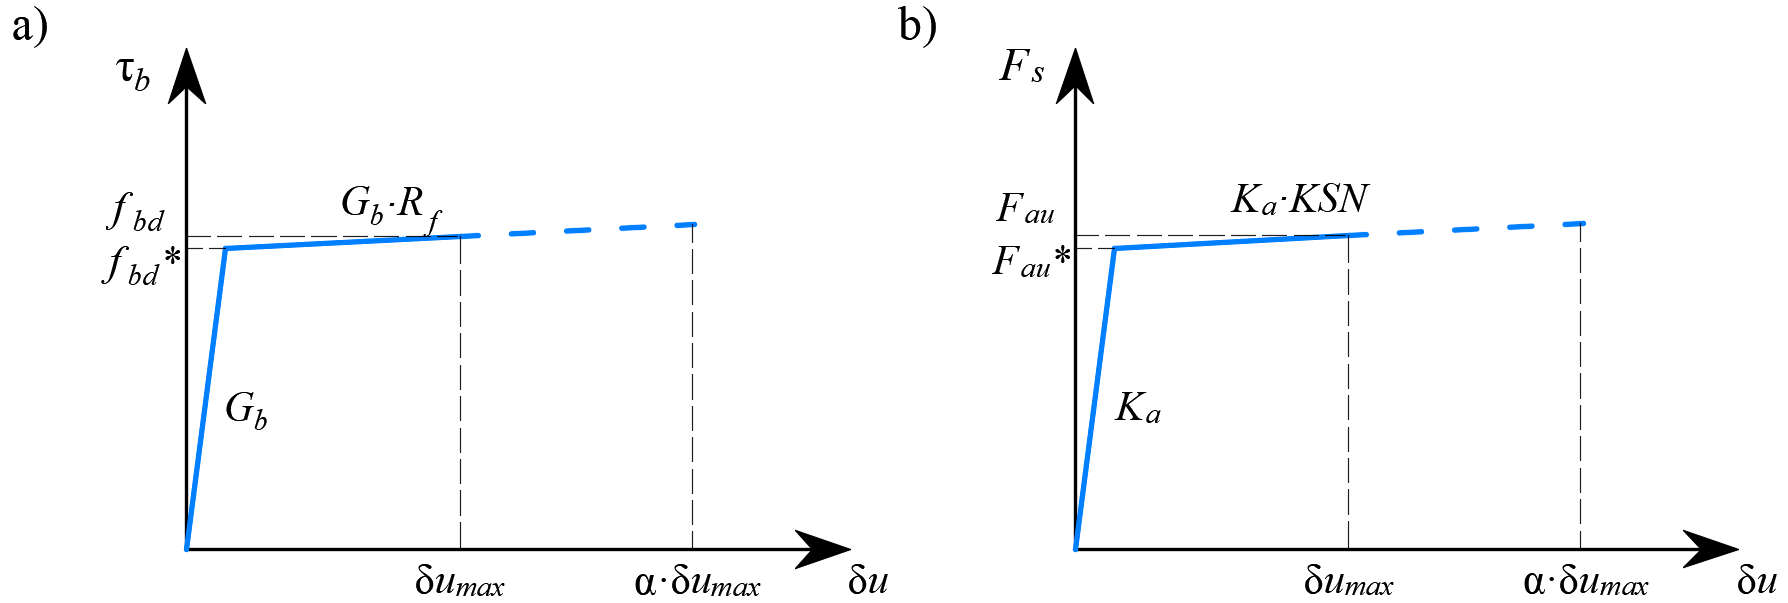
The definition of the bond element is similar to that of a shell element (CQUAD4). It is also defined by 4 nodes, but in contrast to a shell, it only has a non-zero stiffness in shear between the two upper and two lower nodes. In the model, the upper nodes are connected to the elements representing reinforcement and the lower nodes to those representing concrete. The behavior of this element is described by the bond stress, τb, as a bilinear function of the slip between the upper and lower nodes, δu, see Fig. 14.
\[ \textsf{\textit{\footnotesize{Fig. 14\qquad (a) conceptual illustration of the deformation of a bond element; (b) a stress-deformation function.}}}\]
The elastic stiffness modulus of the bond-slip relationship, Gb, is defined as follows:
\[G_b = k_g \cdot \frac{E_c}{Ø}\]
where:
kg coefficient depending on the reinforcing bar surface (by default kg = 0.2)
Ec modulus of elasticity of concrete (taken as Ecm in case of EN)
Ø the diameter of the reinforcing bar
The design values (factored values) of ultimate bond shear stress, fbd, provided in the respective selected design codes EN 1992-1-1 or ACI 318-19 are used to verify the anchorage length. The hardening of the plastic branch is calculated by default as Gb/105.
Anchorage spring
The provision of anchorage ends to the reinforcing bars (i.e., bends, hooks, loops…), which fulfills the prescriptions of design codes, allows the reduction of the basic anchorage length of the bars (lb,net) by a certain factor β (referred to as the ‘anchorage coefficient’ below). The design value of the anchorage length (lb) is then calculated as follows:
\[l_b = \left(1 - \beta\right)l_{b,net}\]
The intended reduction in lb,net is equivalent to the activation of the reinforcing bar at its end at a percentage of its maximum capacity given by the anchorage reduction coefficient, as shown in Fig. 15a.
\[ \textsf{\textit{\footnotesize{Fig. 15\qquad Model for the reduction of the anchorage length:}}}\]
\[ \textsf{\textit{\footnotesize{(a) anchorage force along the anchorage length of the reinforcing bar; (b) slip-anchorage force constitutive relationship.}}}\]
The reduction of the anchorage length is included in the finite element model by means of a spring element at the end of the bar (Fig. 15), which is defined by the constitutive model shown in Fig. 15b. The maximum force transmitted by this spring (Fau) is:
\[F_{au} = \beta \cdot A_s \cdot f_{yd}\]
where :
β the anchorage coefficient based on anchorage type,
As the cross-section of the reinforcing bar,
fyd the design value (factored value) of the yield strength of the reinforcement.
Meshing
The finite elements are implemented internally, and the analysis model is generated automatically without any need for proficient user interaction. An important part of this process is meshing.
Concrete
All concrete members are meshed together. A recommended element size is automatically computed by the application based on the size and shape of the structure and taking into account the diameter of the largest reinforcing bar. Moreover, the recommended element size guarantees that a minimum of 4 elements are generated in thin parts of the structure, such as slim columns or thin slabs, to ensure reliable results in these areas. The maximum number of concrete elements is limited to 5000, but this value is sufficient to provide the recommended element size for most structures. Designers can always select a user-defined concrete element size by modifying the multiplier of the default mesh size.
Reinforcement
The reinforcement is divided into elements with approximately the same length as the concrete element size. Once the reinforcement and concrete meshes are generated, they are interconnected with bond elements as shown in Fig. 13.
Bearing plates
Auxiliary structural parts, such as bearing plates, are meshed independently. The size of these elements is calculated as 2/3 of the size of concrete elements in the connection area. The nodes of the bearing plate mesh are then connected to the edge nodes of the concrete mesh using interpolation constraint elements (RBE3).
Loads and supports
Patch loads and patch supports are connected only to the reinforcement, as shown in Fig. 16. Therefore, it is necessary to define the reinforcement around them. Connection to all nodes of the reinforcement within the effective radius is ensured by RBE3 elements with equal weight.
\[ \textsf{\textit{\footnotesize{Fig. 16\qquad Patch load mapping to reinforcement mesh.}}}\]
Line supports, and line loads are connected to the nodes of the concrete mesh using RBE3 elements based on the specified width or effective radius. The weight of the connections is inversely proportional to the distance from the support or load impulse.
- Read more about the interconnection between individual loads and mesh in General description of Load impulses in Detail application
Solution method and load-control algorithm
A standard full Newton-Raphson (NR) algorithm is used to find the solution to a non-linear FEM problem.
Generally, the NR algorithm does not often converge when the full load is applied in a single step. A usual approach, which is also used here, is to apply the load sequentially in multiple increments and use the result from the previous load increment to start the Newton solution of a subsequent one. For this purpose, a load control algorithm was implemented on top of the Newton-Raphson. In the case that the NR iterations do not converge, the current load increment is reduced to half its value, and the NR iterations are retried.
A second purpose of the load-control algorithm is to find the critical load, which corresponds to certain “stop criteria” – specifically the maximum strain in concrete, the maximum slip in bond elements, the maximum displacement in anchorage elements, and the maximum strain in reinforcing bars. The critical load is found using the bisection method. In the case that the stop criterion is exceeded anywhere in the model, the results of the last load increment are discarded, and a new increment of half the size of the previous one is calculated. This process is repeated until the critical load is found with a certain error tolerance.
For concrete, the stop criterion was set to a 5% strain in compression (i.e., around an order of magnitude larger than the actual failure strain of concrete) and 7% in tension at the integration points of shell elements. In tension, the value was set to allow for the limit strain in reinforcement, which is usually around 5% without accounting for tension stiffening, to be reached first. In compression, the value was chosen from among several alternatives as one that is large enough for the effects of crushing to be visible in the results, but small enough so as not to cause too many problems with numerical stability.
\[ \textsf{\textit{\footnotesize{Fig. 17\qquad Constitutive relationship of bond and anchorage elements used for anchorage length verification:}}}\]
\[ \textsf{\textit{\footnotesize{(a) bond shear stress slip response of a bond element; (b) force-displacement response of an anchorage element.}}}\]
For reinforcement, the stop criterion is defined in terms of stresses. Since stresses at the crack are modeled, the criterion in tension corresponds to the reinforcement tensile strength accounting for the safety coefficient. The same value is used for the criterion in compression.
The stop criterion in bond elements and anchorage springs is α·δumax, where δumax is the maximal slip used in code checks and α = 10.
Presentation of results
Results are presented independently for concrete and for reinforcement elements. The stress and strain values in concrete are calculated at the integration points of shell elements. However, as it is not practical to present the data in such a manner, the results are presented by default in nodes, like the maximal value of compressive stress from adjacent gauss integration points in connected elements (Fig. 18). It should be noted that this representation might locally underestimate the results at compressed edges of members in a case that the finite-element size is similar to the depth of the compression zone.
Fig. 18 - Concrete finite element with integration points and nodes: presentation of the results for concrete in nodes and in finite elements.
The results for the reinforcement finite elements are either constant for each element (one value – e.g., for steel stresses) or linear (two values – for bond results). For auxiliary elements, such as elements of bearing plates, only deformations are presented.
Model verification
Limit states and crack width calculation
Assessment of the structure using the CSFM is performed by two different analyses: one for serviceability and one for ultimate limit state load combinations. The serviceability analysis assumes that the ultimate behavior of the element is satisfactory, and the yield conditions of the material will not be reached at serviceability load levels. This approach enables the use of simplified constitutive models (with a linear branch of concrete stress-strain diagram) for serviceability analysis to enhance numerical stability and calculation speed. Therefore, it is recommended the use the workflow presented below, in which the ultimate limit state analysis is carried out as the first step.
Ultimate limit state analysis
The different verifications required by specific design codes are assessed based on the direct results provided by the model. ULS verifications are carried out for concrete strength, reinforcement strength, and anchorage (bond shear stresses).
To ensure a structural element has an efficient design, it is highly recommended to run a preliminary analysis which takes into account the following steps:
- Choose a selection of the most critical load combinations.
- Calculate only Ultimate Limit State (ULS) load combinations.
- Use a coarse mesh (by increasing the multiplier of the default mesh size in Setup (Fig. 19)).
\[ \textsf{\textit{\footnotesize{Fig. 19\qquad Mesh multiplier.}}}\]
Such a model will calculate very quickly, allowing designers to review the detailing of the structural element efficiently and re-run the analysis until all verification requirements are fulfilled for the most critical load combinations. Once all the verification requirements of this preliminary analysis are fulfilled, it is suggested that the complete ultimate load combinations be included and the use of fine mesh size (the mesh size recommended by the program). User can change mesh size by the multiplier, which can reach values from 0.5 to 5 (Fig. 19).
The basic results and verifications (stress, strain, and utilization (i.e., the calculated value/limit value from the code), as well as the direction of principal stresses in the case of concrete elements) are displayed by means of different plots where compression is generally presented in red and tension in blue. Global minimum and maximum values for the entire structure can be highlighted as well as minimum and maximum values for every user-defined part. In a separate tab of the program, advanced results such as tensor values, deformations of the structure, and reinforcement ratios (effective and geometric) used for computing the tension stiffening of reinforcing bars can be shown. Furthermore, loads and reactions for selected combinations or load cases can be presented.
Serviceability limit state analysis
SLS assessments are carried out for stress limitation, crack width, and deflection limits. Stresses are checked in concrete and reinforcement elements according to the applicable code in a similar manner to that specified for the ULS.
The serviceability analysis contains certain simplifications of the constitutive models which are used for ultimate limit state analysis. A perfect bond is assumed, i.e., the anchorage length is not verified at serviceability. Furthermore, the plastic branch of the stress-strain curve of concrete in compression is disregarded, while the elastic branch is linear and infinite. These simplifications enhance the numerical stability and calculation speed, and do not reduce the generality of the solution as long as the resultant material stress limits at serviceability are clearly below their yielding points (as required by standards). Therefore, the simplified models used for serviceability are only valid if all verification requirements are fulfilled.
Crack width calculation and Tension stiffening
Crack width calculation
There are two ways of computing crack widths - stabilized and non-stabilized cracking. According to the geometrical reinforcement ratio in each part of the structure is decided, which type of crack calculation model will be used (TCM for stabilized cracking and POM for non-stabilized cracking model).
\( \textsf{\textit{\footnotesize{Fig. 20 \qquad Crack width calculation: (a) considered crack kinematics; (b) projection of crack kinematics into the principal}}}\) \( \textsf{\textit{\footnotesize{directions of the reinforcing bar; (c) crack width in the direction of the reinforcing bar for stabilized cracking; (d) cases with}}}\) \( \textsf{\textit{\footnotesize{local non-stabilized cracking regardless of the reinforcement amount; (e) crack width in the direction of the reinforcing bar}}}\)\( \textsf{\textit{\footnotesize{for non-stabilized cracking.}}}\)
While the CSFM yields a direct result for most verifications (e.g., member capacity, deflections…), crack width results are calculated from the reinforcement strain results directly provided by FE analysis following the methodology described in Fig. 20. A crack kinematic without slip (pure crack opening) is considered (Fig. 20a), which is consistent with the main assumptions of the model. The principal directions of stresses and strains define the inclination of the cracks (θr = θs= θe). According to (Fig. 20b), the crack width (w) can be projected in the direction of the reinforcing bar (wb), leading to:
\[w = \frac{w_b}{\cos\left(θ_r + θ_b - \frac{π}{2}\right)}\]
where θb is the bar inclination.
Please note, that the program displays values of θr and θb < π/2. It means that the previous equation works for cases, where the reinforcement and crack go through the different quadrants of the Cartesian coordinate system as shown in Fig. 20, where reinforcement goes through I. and III. quadrants and crack through II and IV. For cases where the reinforcement and crack go through the same quadrants, the equation has to be modified as follows:
\[w = \frac{w_b}{\cos\left(-θ_r + θ_b + \frac{π}{2}\right)}\]
The component wb is consistently calculated based on the tension stiffening models by integrating the reinforcement strains. For those regions with fully developed crack patterns, the calculated average strains (em) along the reinforcing bars are directly integrated along the crack spacing (sr), as indicated in (Fig. 20c). While this approach to calculating the crack directions does not correspond to the real position of the cracks, it still provides representative values that lead to crack width results that can be compared to code-required crack width values at the position of the reinforcing bar.
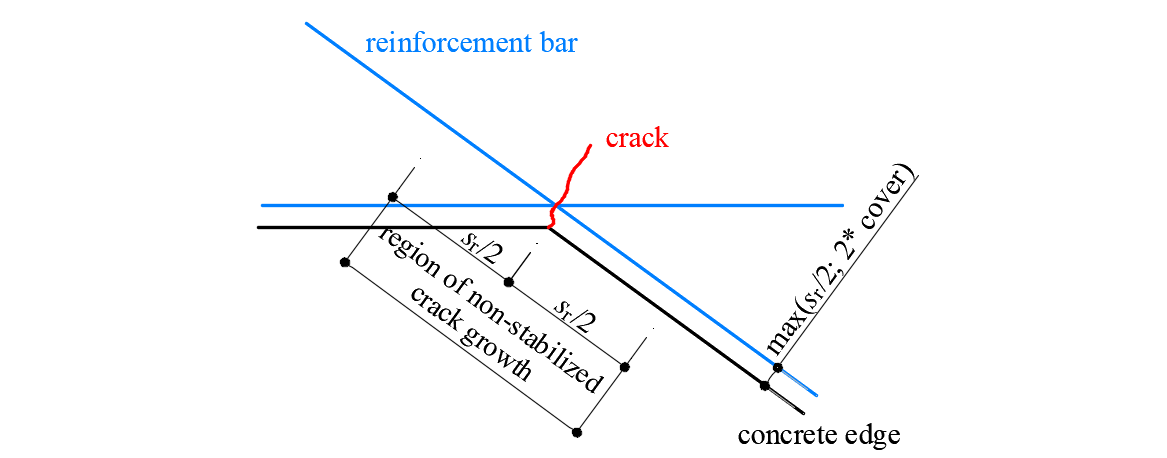
Special situations are observed at concave corners of the calculated structure. In this case, the corner predefines the position of a single crack that behaves in a non-stabilized fashion before additional adjacent cracks develop. These additional cracks generally develop after the serviceability range (Mata-Falcón 2015), which justifies calculating the crack widths in such a region as if they were non-stabilized (Fig. 21).
\[ \textsf{\textit{\footnotesize{Fig. 21\qquad Definition of the region at concave corners in which the crack width is computed as if it were non-stabilized.}}}\]
Tension stiffening
The implementation of tension stiffening distinguishes between cases of stabilized and non-stabilized crack patterns. In both cases, the concrete is considered fully cracked before loading by default.
\( \textsf{\textit{\footnotesize{Fig. 22\qquad Tension stiffening model: (a) tension chord element for stabilized cracking with distribution of bond shear,}}}\) \( \textsf{\textit{\footnotesize{steel and concrete stresses, and steel strains between cracks, considering average crack spacing); (b) pull-out assumption}}}\) \( \textsf{\textit{\footnotesize{for non-stabilized cracking with distribution of bond shear and steel stresses and strains around the crack; (c) resulting}}}\) \( \textsf{\textit{\footnotesize{tension chord behavior in terms of reinforcement stresses at the cracks and average strains for European B500B steel;}}}\) \( \textsf{\textit{\footnotesize{(d) detail of the initial branches of the tension chord response.}}}\)
Stabilized cracking
In fully developed crack patterns, tension stiffening is introduced using the Tension Chord Model (TCM) (Marti et al. 1998; Alvarez 1998) – Fig. 22a – which has been shown to yield excellent response predictions in spite of its simplicity (Burns 2012). The TCM assumes a stepped, rigid-perfectly plastic bond shear stress-slip relationship with τb = τb0 =2 fctm for σs ≤ fy and τb =τb1 = fctm for σs > fy. Treating every reinforcing bar as a tension chord – Fig. 22b and Fig. 22a – the distribution of bond shear, steel, and concrete stresses and hence the strain distribution between two cracks can be determined for any given value of the maximum steel stresses (or strains) at the cracks.
For sr = sr0, a new crack may or may not form because at the center between two cracks σc1 = fct. Consequently, the crack spacing may vary by a factor of two, i.e., sr = λsr0, with l = 0.5…1.0. Assuming a certain value for λ, the average strain of the chord (εm) can be expressed as a function of the maximum reinforcement stresses (i.e., stresses at the cracks, σsr). For the idealized bilinear stress-strain diagram for the reinforcing bare bars considered by default in the CSFM, the following closed-form analytical expressions are obtained (Marti et al. 1998):
\[\varepsilon_m = \frac{\sigma_{sr}}{E_s} - \frac{\tau_{b0}s_r}{E_s Ø}\]
\[\textrm{for}\qquad\qquad\sigma_{sr} \le f_y\]
\[{\varepsilon_m} = \frac{{{{\left( {{\sigma_{sr}} - {f_y}} \right)}^2}Ø}}{{4{E_{sh}}{\tau _{b1}}{s_r}}}\left( {1 - \frac{{{E_{sh}}{\tau_{b0}}}}{{{E_s}{\tau_{b1}}}}} \right) + \frac{{\left( {{\sigma_{sr}} - {f_y}} \right)}}{{{E_s}}}\frac{{{\tau_{b0}}}}{{{\tau_{b1}}}} + \left( {{\varepsilon_y} - \frac{{{\tau_{b0}}{s_r}}}{{{E_s}Ø}}} \right)\]
\[\textrm{for}\qquad\qquad{f_y} \le {\sigma _{sr}} \le \left( {{f_y} + \frac{{2{\tau _{b1}}{s_r}}}{Ø}} \right)\]
\[ \varepsilon_m = \frac{f_s}{E_s} + \frac{\sigma_{sr}-f_y}{E_{sh}} - \frac{\tau_{b1} s_r}{E_{sh} Ø}\]
\[\textrm{for}\qquad\qquad\left(f_y + \frac{2\tau_{b1}s_r}{Ø}\right) \le \sigma_{sr} \le f_t\]
where:
Esh the steel hardening modulus Esh = (ft – fy)/(εu – fy /Es) ,
Es modulus of elasticity of reinforcement,
Ø reinforcing bar diameter,
sr crack spacing,
σsr reinforcement stresses at the cracks,
σs actual reinforcement stresses,
fy yield strength of reinforcement.
The Idea StatiCa Detail implementation of the CSFM considers average crack spacing by default when performing computer-aided stress field analysis. The average crack spacing is considered to be 2/3 of the maximum crack spacing (λ = 0.67), which follows recommendations made on the basis of bending and tension tests (Broms 1965; Beeby 1979; Meier 1983). It should be noted that calculations of crack widths consider a maximum crack spacing (λ = 1.0) in order to obtain conservative values.
The application of the TCM depends on the reinforcement ratio, and hence the assignment of an appropriate concrete area acting in tension between the cracks to each reinforcing bar is crucial. An automatic numerical procedure has been developed to define the corresponding effective reinforcement ratio (ρeff = As/Ac,eff) for any configuration, including skewed reinforcement (Fig. 23).
\( \textsf{\textit{\footnotesize{Fig. 23\qquad Effective area of concrete in tension for stabilized cracking: (a) maximum concrete area that can be activated;}}}\) \( \textsf{\textit{\footnotesize{(b) cover and global symmetry condition; (c) resultant effective area.}}}\)
Non-stabilized cracking
Cracks existing in regions with geometric reinforcement ratios lower than ρcr, i.e., the minimum reinforcement amount for which the reinforcement is able to carry the cracking load without yielding, are generated by either non-mechanical actions (e.g. shrinkage) or the progression of cracks controlled by other reinforcement. The value of this minimum reinforcement is obtained as follows:
\[{\rho _{cr}} = \frac{{{f_{ct}}}}{{{f_y} - \left( {n - 1} \right){f_{ct}}}}\]
where:
fy reinforcement yield strength,
fct concrete tensile strength,
n modular ratio, n = Es / Ec .
For conventional concrete and reinforcing steel, ρcr amounts to approximately 0.6%.
For stirrups with reinforcement ratios below ρcr, cracking is considered to be non-stabilized and tension stiffening is implemented by means of the Pull-Out Model (POM) described in Fig. 22b. This model analyzes the behavior of a single crack considering no mechanical interaction between separate cracks, neglecting the deformability of concrete in tension and assuming the same stepped, rigid-perfectly plastic bond shear stress-slip relationship used by the TCM. This allows the reinforcement strain distribution (εs) in the vicinity of the crack to be obtained for any maximum steel stress at the crack (σsr) directly from equilibrium. Given the fact that the crack spacing is unknown for a non-fully developed crack pattern, the average strain (εm) is computed for any load level over the distance between points with zero slip when the reinforcing bar reaches its tensile strength (ft) at the crack (lε,avg in Fig. 22b), leading to the following relationships:
The proposed models allow the computation of the behavior of bonded reinforcement, which is finally considered in the analysis. This behavior (including tension stiffening) for the most common European reinforcing steel (B500B, with ft / fy = 1.08 and εu = 5%) is illustrated in Fig. 22c-d.
Structural verifications according to Eurocode
Assessment of the structure using CSFM is performed by two different analyses: one for serviceability, and one for ultimate limit state load combinations. The serviceability analysis assumes that the ultimate behavior of the element is satisfactory, and the yield conditions of the material will not be reached at serviceability load levels. This approach enables the use of simplified constitutive models (with a linear branch of concrete stress-strain diagram) for serviceability analysis to enhance numerical stability and calculation speed.
Material models (EN)
Concrete - ULS
The concrete model implemented in the CSFM is based on the uniaxial compression constitutive laws prescribed by EN 1992-1-1 for the design of cross-sections, which only depend on compressive strength. The parabola-rectangle diagram specified in EN 1992-1-1 Cl. 3.1.7 (1) (Fig. 24a) is used by default in the CSFM, but designers can also choose a more simplified elastic ideal plastic relationship according to EN 1992-1-1 Cl. 3.1.7 (2) (Fig. 24b). The tensile strength is neglected, as it is in classic reinforced concrete design.
\[ \textsf{\textit{\footnotesize{Fig. 24\qquad The stress-strain diagrams of concrete for ULS: a) parabola-rectangle diagram; b) bilinear diagram.}}}\]
The implementation of the CSFM in IDEA StatiCa Detail does not consider an explicit failure criterion in terms of strains for concrete in compression (i.e., after the peak stress is reached it considers a plastic branch with εcu2 (εcu3) in value 5% while EN 1992-1-1 assumes ultimate strain less than 0.35%). This simplification does not allow the deformation capacity of structures failing in compression to be verified. However, their ultimate capacity fcd according to EN 1992-1-1 3.1.3 is properly predicted when, in addition to the factor of cracked concrete (kc2 defined in (Fig. 25)), the increase in the brittleness of concrete as its strength rises is considered by means of the \(\eta_{fc}\) reduction factor defined in fib Model Code 2010 as follows:
\[f_{cd}={\alpha_{cc}} \cdot \frac{f_{ck,red}}{γ_c} = {\alpha_{cc}} \cdot \frac{k_c \cdot f_{ck}}{γ_c} = {\alpha_{cc}} \cdot \frac{\eta _{fc} \cdot k_{c2} \cdot f_{ck}}{γ_c}\]
\[{\eta _{fc}} = {\left( {\frac{{30}}{{{f_{ck}}}}} \right)^{\frac{1}{3}}} \le 1\]
where:
αcc is the coefficient taking account of long-term effects on the compressive strength and of unfavorable effects resulting from the way the load is applied. It is according to the EN 1992-1-1 Cl. 3.1.6 (1). The default value is 1,0.
kc is the global reduction factor of the compressive strength
kc2 is the reduction factor due to the presence of transverse cracking
fck is the concrete cylinder characteristic strength (in MPa for the definition of \( \eta_{fc} \)).
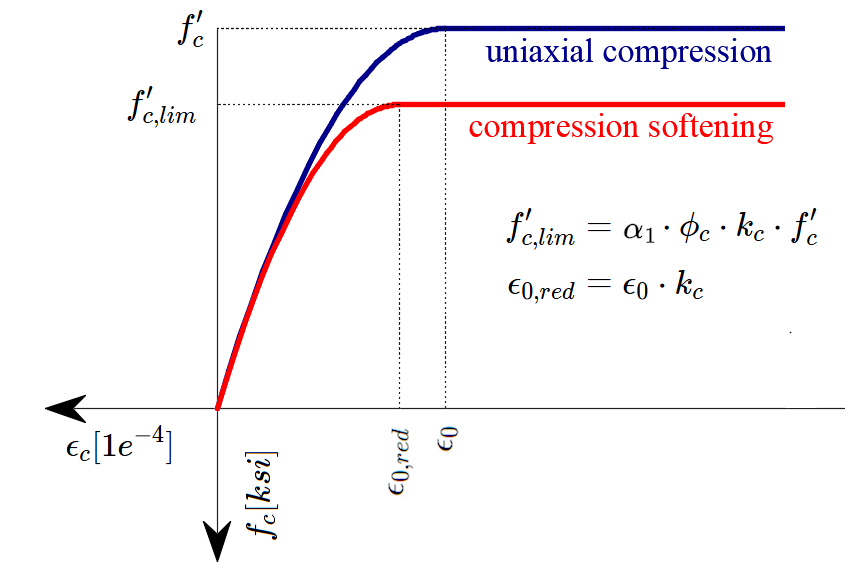
\[ \textsf{\textit{\footnotesize{Fig. 25\qquad The compression softening law.}}}\]
Concrete - SLS
The serviceability analysis contains certain simplifications of the constitutive models which are used for ultimate limit state analysis. The plastic branch of the stress-strain curve of concrete in compression is disregarded, while the elastic branch is linear and infinite. Compression softening law is not considered. These simplifications enhance the numerical stability and calculation speed and do not reduce the generality of the solution as long as the resultant material stress limits at serviceability are clearly below their yielding points (as required by Eurocode). Therefore, the simplified models used for serviceability are only valid if all verification requirements are fulfilled.
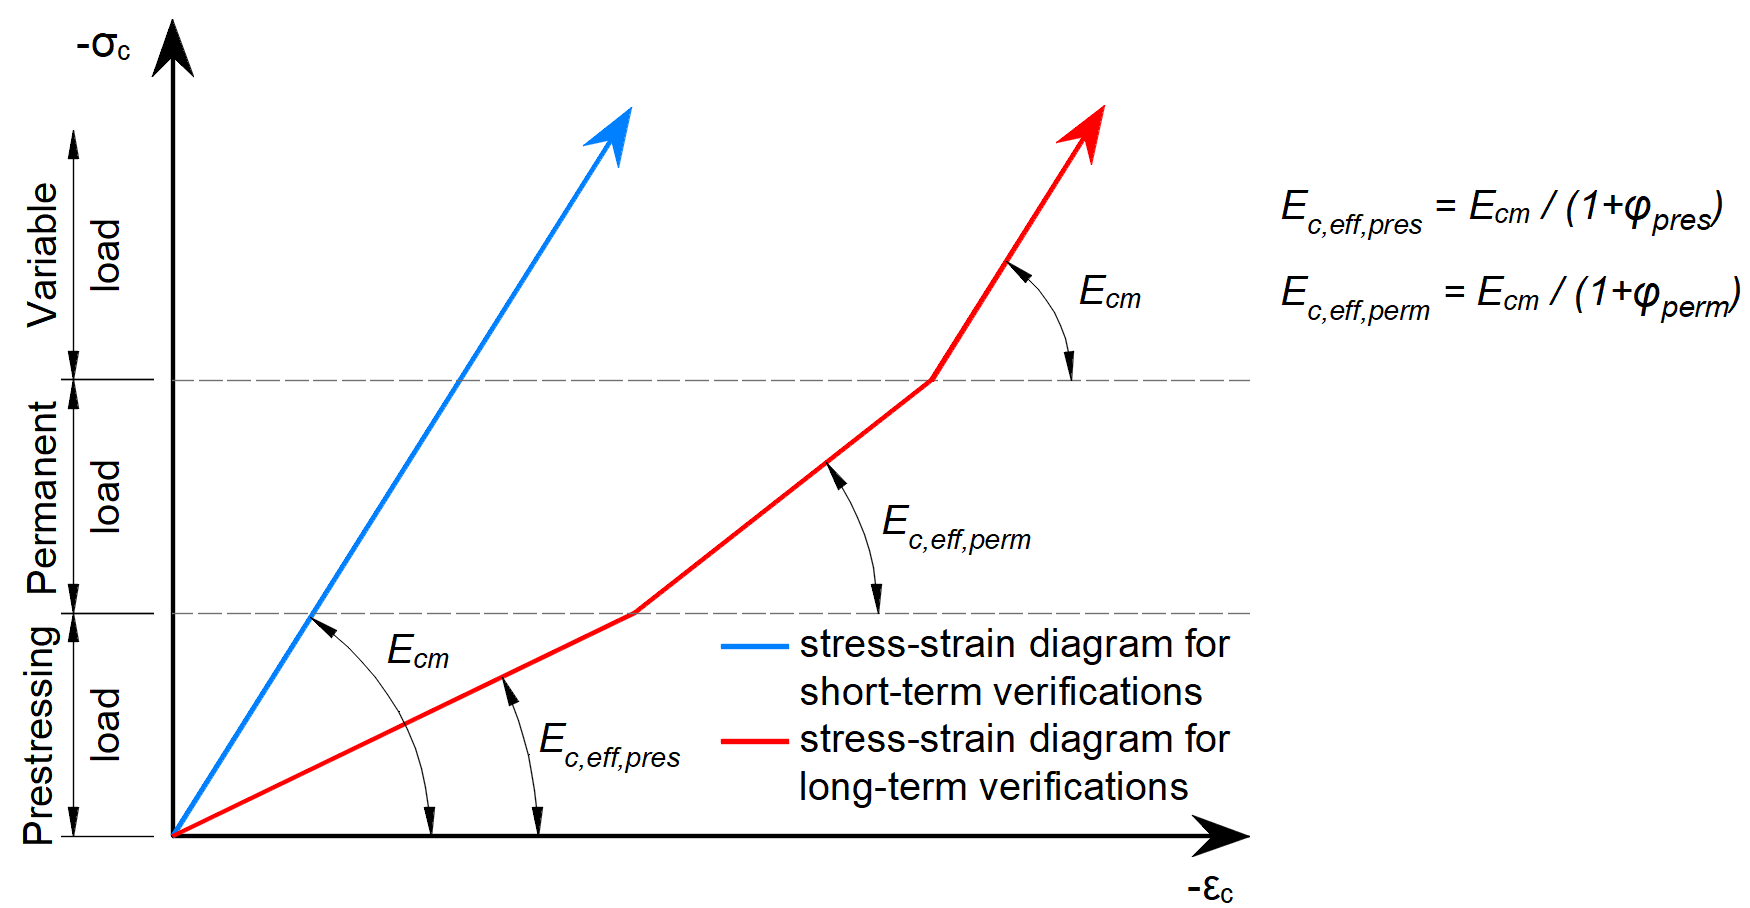
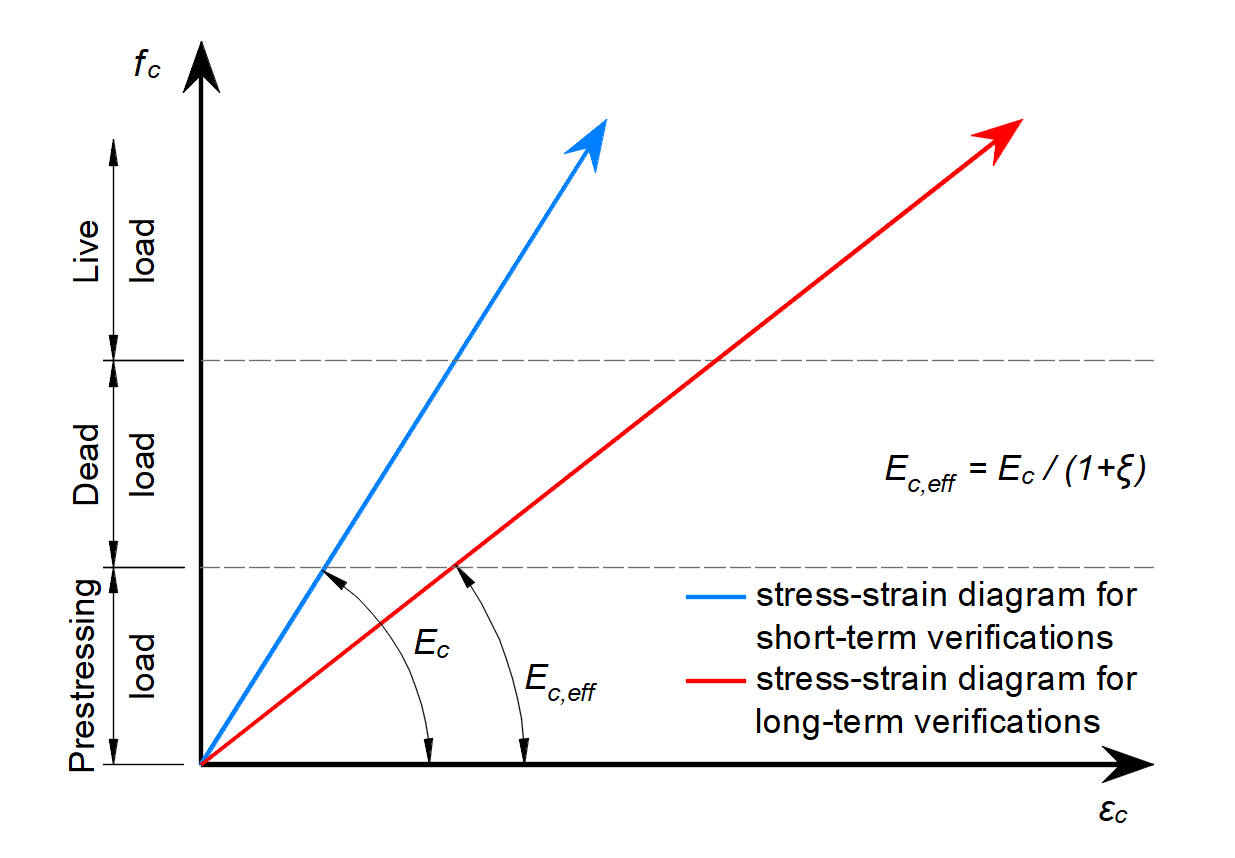
\[ \textsf{\textit{\footnotesize{Fig. 26\qquad Concrete stress-strain diagrams implemented for serviceability analysis: short- and long-term verifications.}}}\]
Long term effects
In serviceability analysis, the long-term effects of concrete are considered using an effective infinite creep coefficient (\(\varphi\), taken as a value of 2.5 by default) which modifies the secant modulus of elasticity of concrete (Ecm) according to EN 1992-1-1, section 3.1.4 (3) resp. 7.4.3 (5) as follows:
\[E_{c,eff} = \frac{E_{cm}}{1+\varphi}\]
When considering long-term effects, a load step with all permanent loads is first calculated considering the creep coefficient (i.e., using the effective modulus of elasticity of concrete, Ec,eff) and then the additional loads are calculated without the creep coefficient (i.e., using Ecm). In addition, to conduct short-term verifications, another calculation is performed in which all loads are calculated without the creep coefficient. Both calculations for long and short-term verifications are depicted in Fig. 26.
Creep factors are defined by the user in material properties and shall be calculated according to EN 1992-1-1, Fig 3.1.
Reinforcement
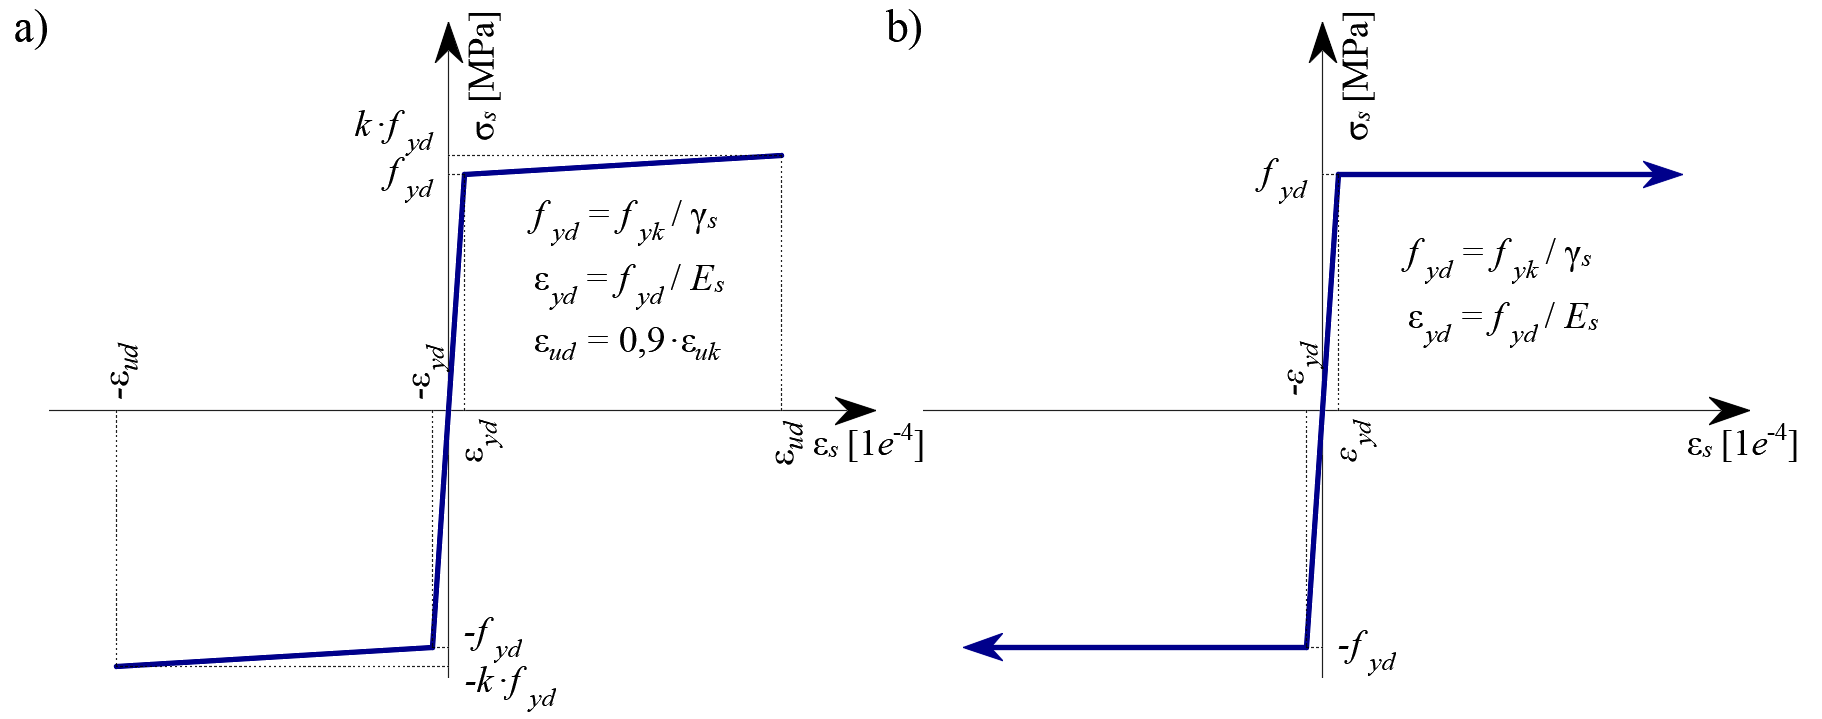
By default, the idealized bilinear stress-strain diagram for the bare reinforcing bars defined in EN 1992-1-1, section 3.2.7 (Fig. 27) is considered. The definition of this diagram only requires the basic properties of the reinforcement to be known during the design phase (strength and ductility class). Whenever known, the actual stress-strain relationship of the reinforcement (hot-rolled, cold-worked, quenched and self-tempered, …) can be considered. The reinforcement stress-strain diagram can be defined by the user, but in this case, it is impossible to assume the tension stiffening effect (it is impossible to calculate crack width). Using the stress-strain diagram with a horizontal top branch does not allow for the verification of structural durability. Therefore, manual verification of standard ductility requirements is necessary.
\( \textsf{\textit{\footnotesize{Fig. 27 \qquad Stress-strain diagram of reinforcement: a) bilinear diagram with an inclined top branch; b) bilinear diagram}}}\) \( \textsf{\textit{\footnotesize{with a horizontal top branch.}}}\)
Tension stiffening (Fig. 28) is accounted for automatically by modifying the input stress-strain relationship of the bare reinforcing bar in order to capture the average stiffness of the bars embedded in the concrete (εm).
\[ \textsf{\textit{\footnotesize{Fig. 28\qquad Scheme of tension stiffening.}}}\]
Safety factors
The Compatible Stress Field Method is compliant with modern design codes. As the calculation models only use standard material properties, the partial safety factor format prescribed in the design codes can be applied without any adaptation. In this way, the input loads are factored, and the characteristic material properties are reduced using the respective safety coefficients prescribed in design codes, exactly as in conventional concrete analysis. Values of material safety factors prescribed in EN 1992-1-1 chap. 2.4.2.4 are set by default, but the user can change safety factors in the Code and calculation settings (Fig. 29).
\[ \textsf{\textit{\footnotesize{Fig. 29\qquad The setting of material safety factors in Idea StatiCa Detail.}}}\]
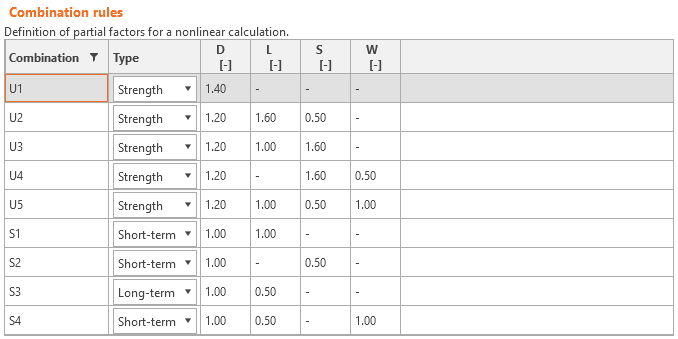
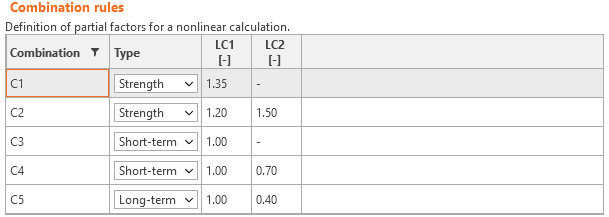
Load safety factors have to be defined by the user in Combination rules for each non-linear combination of load cases (Fig. 30). For all templates implemented in Idea StatiCa Detail, partial safety factors are already predefined.
\[ \textsf{\textit{\footnotesize{Fig. 30\qquad The setting of load partial factors in Idea StatiCa Detail.}}}\]
By using appropriate user-defined combinations of partial safety factors, users can also compute with the CSFM using the global resistance factor method (Navrátil, et al. 2017), but this approach is hardly ever used in design practice. Some guidelines recommend using the global resistance factor method for non-linear analysis. However, in simplified non-linear analyses (such as the CSFM), which only require those material properties that are used in conventional hand calculations, it is still more desirable to use the partial safety format.
Ultimate limit state analysis
The different verifications required by EN 1992-1-1 are assessed based on the direct results provided by the model. ULS verifications are carried out for concrete strength, reinforcement strength, and anchorage (bond shear stresses).
The concrete strength in compression is evaluated as the ratio between the maximum principal compressive stress σc = σc2 obtained from FE analysis and the limit value σc,lim = fcd.
The strength of the reinforcement is evaluated in both tension and compression as the ratio between the stress in the reinforcement at the cracks σsr and the specified limit value σs,lim:
\(σ_{s,lim} = \frac{k \cdot f_{yk}}{γ_s}\qquad\qquad\textsf{\small{for bilinear diagram with inclined top branch}}\)
\(σ_{s,lim} = \frac{f_{yk}}{γ_s}\qquad\qquad\,\,\,\,\textsf{\small{for bilinear diagram with horizontal top branch}}\)
where:
fyk yield strength of the reinforcement according to EN 1992-1-1 Cl. 3.2.3,
k the ratio of tensile strength ftk to the yield stress,
\(k = \frac{f_{tk}}{f_{yk}}\)
γs is the partial safety factor for reinforcement
The bond shear stress is evaluated independently as the ratio between the bond stress τb calculated by FE analysis and the ultimate bond strength fbd, according to EN 1992-1-1 chap. 8.4.2:
\[\frac{τ_{b}}{f_{bd}}\]
\[f_{bd} = 2.25 \cdot η_1\cdot η_2\cdot f_{ctd}\]
where:
fctd is the design value of concrete tensile strength according to EN 1992-1-1 Cl. 3.1.6 (2). Due to the increasing brittleness of higher-strength concrete, fctk,0.05 is limited to the value for C60/75 according to EN 1992-1-1 Cl. 8.4.2 (2)
η1 is a coefficient related to the quality of the bond condition and the position of the bar during concreting (Fig. 31).
η1 = 1.0 when ‘good’ conditions are obtained and
η1 = 0.7 for all other cases and for bars in structural elements built with slip-forms, unless it can be shown that ‘good’ bond conditions exist
η2 is related to the bar diameter:
η2 = 1.0 for Ø ≤ 32 mm
η2 = (132 - Ø)/100 for Ø > 32 mm
\[ \textsf{\textit{\footnotesize{Fig. 31\qquad EN 1992-1-1 Figure 8.2 - Description of bond conditions.}}}\]
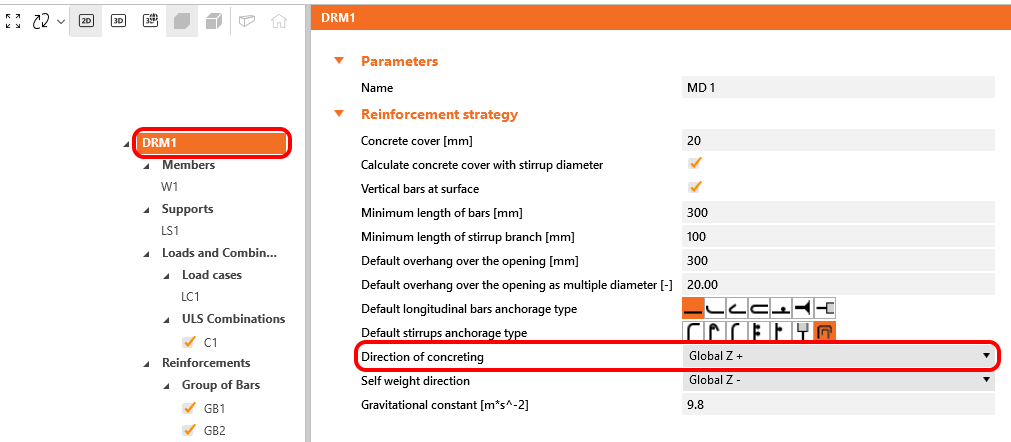
In IDEA StatiCa Detail the bond conditions are taken into account according to Fig. 31 c) and d). The direction of concreting can be set in the application for each project item as follows.
These verifications are carried out with respect to the appropriate limit values for the respective parts of the structure (i.e., in spite of having a single grade both for concrete and reinforcement material, the final stress-strain diagrams will differ in each part of the structure due to tension stiffening and compression softening effects).
Total force Ftot and Limit force Flim
The total force Ftot is a result of the finite element analysis and can be defined in two ways.
\[F_{tot}=A_{s}\cdot \sigma_{s}\]
where As is the area of the reinforcement bar and σs is the stress in the bar.
Or as a sum of the anchorage force Fa and the bond force Fbond.
\[F_{tot}=F_{a}+F_{bond}\]
where Fa is the actual force in the anchorage spring and Fbond is the bond force that can be obtained by integrating the bond stress τb along the length of reinforcement bar l.
\[F_{bond}=C_{s} \cdot \int_{0}^{l}\tau_{b}\left( x \right)dx\]
Cs is the circumference of the reinforcement bar.
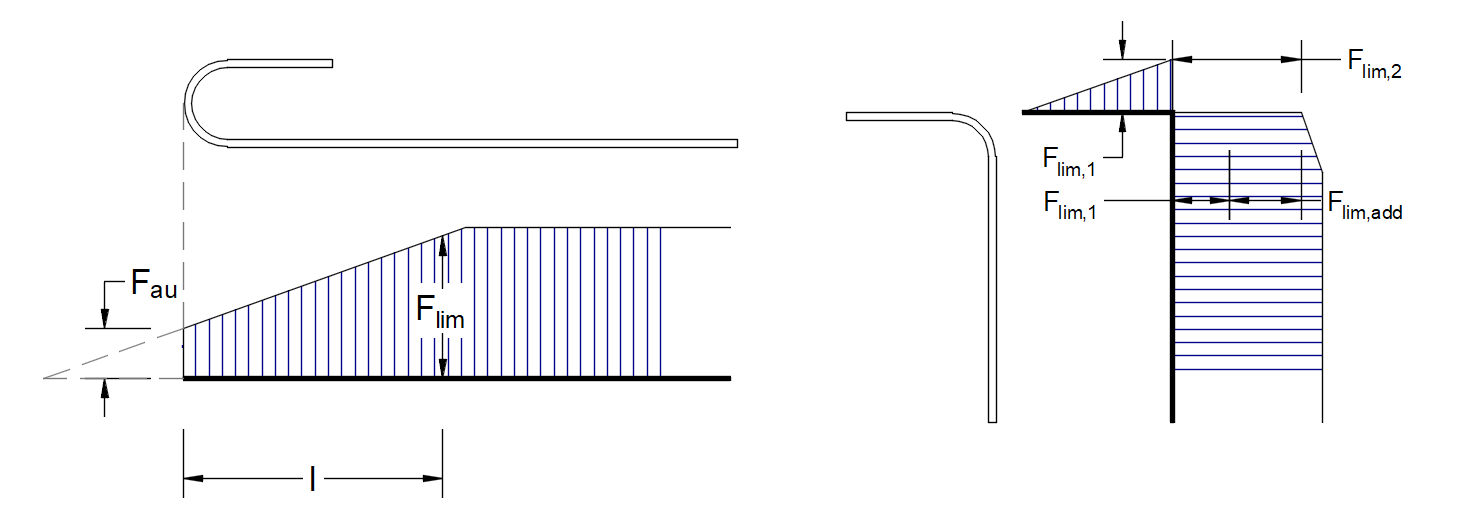
The limit force Flim is the maximum force in the element of the rebar considering the ultimate strength of the rebar and also anchoring conditions (bond between concrete and reinforcement and anchorage hooks, loops, etc.).
\[F_{lim}=min\left( F_{lim,bond}+F_{au},F_{u} \right)\]
\[F_{u}=k\cdot f_{yd}\cdot A_{s}\]
\[F_{au}=\beta\cdot k\cdot f_{yd}\cdot A_{s}\]
\[F_{lim,bond}=C_{s}\cdot l \cdot f_{bd}\]
where Cs is the circumference of the reinforcement bar, and l is the length from the beginning of the rebar to the point of interest.
\[ \textsf{\textit{\footnotesize{Fig. 32\qquad Definition of the limit force Flim}}}\]
\[F_{lim,2}=F_{lim,1}+F_{lim,add}\]
where Flim,add is the additional force calculated from the magnitude of the angle between neighboring elements. Flim,2 must be always lower than Fu.
The available anchorage types in the CSFM include a straight bar (i.e., no anchor end reduction), bend, hook, loop, welded transverse bar, perfect bond, and continuous bar. All these types, along with the respective anchorage coefficients β, are shown in Fig. 32 for longitudinal reinforcement and in Fig. 33 for stirrups. The values of the adopted anchorage coefficients are in accordance with EN 1992-1-1 section 8.4.4 Tab. 8.2. It should be noted that in spite of the different available options, the CSFM distinguishes three types of anchorage ends: (i) no reduction in the anchorage length, (ii) a reduction of 30 % of the anchorage length in the case of a normalized anchorage and (iii) perfect bond.
\[ \textsf{\textit{\footnotesize{Fig. 33\qquad Available anchorage types and respective anchorage coefficients for longitudinal reinforcing bars in the CSFM:}}}\]
\[ \textsf{\textit{\footnotesize{(a) straight bar; (b) bend; (c) hook; (d) loop; (e) welded transverse bar; (f) perfect bond; (g) continuous bar.}}}\]
\[ \textsf{\textit{\footnotesize{Fig. 33\qquad Available anchorage types and respective anchorage coefficients for stirrups.}}}\]
\[ \textsf{\textit{\footnotesize{Closed stirrups: (a) hook; (b) bend; (c) overlap. Open stirrups: (d) hook; (e) continuous bar.}}}\]
In order to comply with EN 1992-1-1, the anchorage spring should be used in the calculation, the anchorage spring is modified by the β coefficient so the user must use one of the available anchorage types when defining the reinforcement start and end conditions.
Partially loaded areas (PLA)
When designing concrete structures, we meet two large groups of partially loaded areas (PLA) - the first of these comprises bearings, while the other consists of anchoring areas. According to currently valid standards for the design of reinforced concrete structures EN 1992-1-1 chap. 6.7 (Fig. 34), local crushing of concrete and transverse tension forces should be considered for partially loaded areas. For a uniformly distributed load on an area, Ac0, the compressive capacity of concrete may be increased by up to three times depending on the design distribution area Ac1.
\[ \textsf{\textit{\footnotesize{Fig. 34\qquad Partially loaded areas according to EN 1992-1-1.}}}\]
The partially loaded area must be sufficiently reinforced with transverse reinforcement designed to transmit the bursting forces that occur in the area. For the design of transverse reinforcement in partially loaded areas, the Strut-and-Tie method is used according to the Eurocode. Without the required transverse reinforcement, it is not possible to consider increasing the compressive capacity of the concrete.
Partially loaded areas in the CSFM
\[ \textsf{\textit{\footnotesize{Fig. 35\qquad Fictitious struts with concrete finite element mesh.}}}\]
Using the CSFM, it is possible to design and assess reinforced concrete structures while including the influence of the increasing compressive resistance of concrete in partially loaded areas. Because the CSFM is a wall (2D) model and the partially loaded areas are a spatial (3D) task, it was necessary to find a solution that combines these two different types of tasks (Fig. 35). If the “partially loaded areas” function is activated, the allowable cone geometry is created according to the Eurocode (Fig. 34). All geometric collisions are solved fully in 3D for the specified concrete member geometry and the dimensions of each PLA. Subsequently, a computational model of the partially loaded area is created.
\[ \textsf{\textit{\footnotesize{Fig. 36\qquad Allowable cone geometries.}}}\]
The modification of the material model proved to be an unsuitable approach, which was mainly because the mapping of properties to the finite element mesh is problematic. It was determined that an approach independent of the finite element mesh is a more appropriate solution. Absolutely coherent fictitious struts are created for the known compression cone geometry (Fig. 35 and Fig. 37). These struts have identical material properties to the concrete used in the model, including the stress-strain diagram. The shape of the cone determines the direction of the struts, which gradually distributes the load over the PLA to the design distribution area. The area density of the fictitious struts is variable at each part of the cone, and it adds a fictitious concrete area in the load direction. At the level of the loaded area (Ac0), a fictitious area of concrete is added according to the ratio \(\sqrt{A_{c0} \cdot A_{c1}} - A_{real}\) (where Areal is an area of the support assumed in the 2D computational model), and this area decreases linearly to zero towards the design distribution area (Ac1). This solution ensures that the compressive stress in the concrete is constant over the entire cone volume.
\[\rho \left( {\beta ,z} \right) = \left( {\sqrt {\frac{A_{c1}}{A_{c0}}} - \frac{A_{real}}{A_{c0}}} \right)\,\cdot\,\left( {1 - \frac{z}{h}} \right)\,\cdot\,\frac{1}{{\cos \beta }}\]
\[ \textsf{\textit{\footnotesize{Fig. 37\qquad Fictitious struts in the computational model}}}\]
The resistance of the partially loaded area is increased according to the ratio of the design distributed area and the loaded area laid in EN 1992-1-1 (6.7). It should be remembered that this is a design model that cannot precisely describe the stress state over a partially loaded area whose actual flow is much more complicated. However, this solution allows the correct distribution of load to the whole model while respecting the increased load capacity of the partially loaded area. In addition, it correctly introduces transverse stresses in this area.
While using the Partially areas loaded areas feature to simulate the increase of concrete compressive capacity, it is necessary to provide the code check separately according to EN 1992-1-1, section 6.7 (2). The transverse tensile forces (splitting forces) transferred by the reinforcement are automatically checked.
Serviceability limit state analysis
SLS assessments are carried out for stress limitation, crack width, and deflection limits. Stresses are checked in concrete and reinforcement elements according to EN 1992-1-1 in a similar manner to that specified for the ULS.
Stress limitation
The compressive stress in the concrete shall be limited in order to avoid longitudinal cracks. According to EN 1992-1-1 chap. 7.2 (2), longitudinal cracks may occur if the stress level under the characteristic combination of loads exceeds a value k1fck. The concrete stress in compression is evaluated as the ratio between the maximum principal compressive stress σc = σc2 obtained from FE analysis for serviceability limit states and the limit value σc,lim. Then:
\[\frac{σ_{c}}{σ_{c,lim}}\]
\[σ_{c,lim} = k_1\cdot f_{ck}\]
where:
fck characteristic cylinder strength of concrete,
k1 =0.6.
If the stress in the concrete under the quasi-permanent loads is less than k2fck according to EN 1992-1-1 Cl. 7.2(3), linear creep may be assumed. If the stress in concrete exceeds k2fck, non-linear creep should be considered (see EN 1992-1-1 Cl. 3.1.4). In IDEA StatiCa Detail only linear creep according to EN 1992-1-1 Cl. 3.1.4 (3) can be assumed (see Material models (EN)).
Unacceptable cracking or deformation may be assumed to be avoided if, under the characteristic combination of loads, the tensile stress in the reinforcement does not exceed k3fyk (EN 1992-1-1 chap. 7.2 (5)). The strength of the reinforcement is evaluated as the ratio between the stress in the reinforcement at the cracks σs = σsr and the specified limit value σs,lim:
\[\frac{σ_{s}}{σ_{s,lim}}\]
\[σ_{s,lim} = k_3\cdot f_{yk}\]
where:
fyk yield strength of the reinforcement,
k3 =0.8.
Deflection
Deflections can only be assessed for walls or isostatic (statically determinate) or hyperstatic (statically indeterminate) beams. In these cases, the absolute value of deflections is considered (compared to the initial state before loading), and the maximum admissible value of deflections must be set by the user. Deflections at trimmed ends cannot be checked since these are essentially unstable structures where the equilibrium is satisfied by adding end forces, and hence deflections are unrealistic. Short-term uz,st or long-term uz,lt deflection can be calculated and checked against user-defined limit values:
\[\frac{u_ z}{u_{z,lim}}\]
where:
uz short- or long-term deflection calculated by FE analysis,
uz,lim limit value of the deflection defined by the user.
Crack width
Crack widths and crack orientations are calculated only for permanent loads, either short-term or long-term. The verifications with respect to limit values specified by the user according to the Eurocode are presented as follows:
\[\frac{w}{w_{lim}}\]
where:
w short- or long-term crack width calculated by FE analysis,
wlim limit value of the crack width defined by the user.
There are two ways of computing crack widths (stabilized and non-stabilized cracking). In the general case (stabilized cracking), the crack width is calculated by integrating the strains on 1D elements of reinforcing bars. The crack direction is then calculated from the three closest (from the center of the given 1D finite element of reinforcement) integration points of 2D concrete elements. While this approach to calculating the crack directions does not correspond to the real position of the cracks, it still provides representative values that lead to crack width results that can be compared to code-required crack width values at the position of the reinforcing bar.
Structural verifications according to ACI 318-19
Assessment of the structure using the CSFM is performed by two different analyses: one for serviceability, and one for strength load combinations. The serviceability analysis assumes that the behavior under factored loads is satisfactory, and the yield conditions of the material will not be reached at serviceability load levels. This approach enables the use of simplified constitutive models (with a linear branch of concrete stress-strain diagram) for serviceability analysis to enhance numerical stability and calculation speed.
CSFM is in accordance with ACI 318-19, chapter 6.8.1.1. In order for the CSFM to meet the requirements from ACI 318-19 Section 6.8.1.2, a lot of verification testing was done at various universities. Individual articles summarizing the results of verification and validation can be found at the following link.
Material models (ACI)
Concrete - Strength
The concrete model implemented for strength calculations in CSFM is based on the parabolic-plastic stress-strain curve for concrete based on the Portland Cement Association’s parabolic stress-strain curve described in PCA’s Notes on ACI 318-99 Building Code Requirements for Structural Concrete, Figure 6-8. The tensile strength is neglected, as it is in classic reinforced concrete design.
\[ \textsf{\textit{\footnotesize{Fig. 38\qquad The stress-strain diagram of concrete for Strength analysis}}}\]
The implementation of CSFM in IDEA StatiCa Detail does not consider an explicit failure criterion in terms of strains for concrete in compression (i.e., after the peak stress is reached, it considers a plastic branch with εc0 in maximum value 5%, while ACI 318-19 Cl. 22.2.2.1 assumes ultimate strain of less than 0.3%). This simplification does not allow the deformation capacity of structures failing in compression to be verified. However, the strength is properly predicted when, in addition to the factor of cracked concrete (kc2 defined in (Fig. 39)), the increase in the brittleness of concrete as its strength rises is considered by means of the \(\eta_{fc}\) reduction factor defined in fib Model Code 2010 as follows:
\[f'_{c,lim}=\alpha_{1}\cdot\phi_{c}\cdot k_{c}\cdot f'_{c}\]
\[k_{c}=\eta_{fc}\cdot k_{c2}\]
\[{\eta _{fc}} = {\left( {\frac{{30}}{{{f'_{c}}}}} \right)^{\frac{1}{3}}} \le 1\]
where:
α1 is the reduction factor of concrete compressive strength defined in ACI 318-19 Cl. 22.2.2.4.1. When using a parabola-rectangle stress-strain diagram, it is necessary to reduce the maximum compressive stress by this factor. This averages the stress distribution in the compression zone in such a way that the resulting compressive strength is less than or equal to the compressive strength calculated using a stress-strain diagram with a decreasing plastic branch.
Φc is the strength reduction factor for concrete. The default value is set according to ACI 318-19 Table 24.2.1 (b)(f).
kc2 is the reduction factor due to the presence of transverse cracking.
f'c is the concrete cylinder strength (in MPa for the definition of \( \eta_{fc} \)).
\[ \textsf{\textit{\footnotesize{Fig. 39\qquad The compression softening law.}}}\]
kc2 is a reduction factor based on the same assumptions as the nodal zone coefficient βn given in ACI 318-19 Table 23.9.2, except that in CSFM, the presence of a principal tensional stress perpendicular to the principal compressional stress is checked for each finite element (not only for nodes of the Strut and Tie model).
Concrete – Serviceability
The serviceability analysis contains certain simplifications of the constitutive models which are used for strength analysis. The plastic branch of the stress-strain curve of concrete in compression is disregarded, while the elastic branch is linear and infinite. Compression softening law is not considered. These simplifications enhance the numerical stability and calculation speed and do not reduce the generality of the solution as long as the resultant material stress limits at serviceability are clearly below their yielding points (as required by ACI). Therefore, the simplified models used for serviceability are only valid if all verification requirements are fulfilled.
\[ \textsf{\textit{\footnotesize{Fig. 40\qquad Concrete stress-strain diagrams implemented for serviceability analysis: short- and long-term verifications.}}}\]
Long-term effects
The long-term behavior of the structure, such as long-term deflections or calculation of crack widths caused by sustained loads, is influenced by concrete creep. The ACI 318-19 in paragraph 24.2.4.1.3 defines the time-dependent factor for sustained loads – ξ representing creep effect for specified sustained load duration.
In the Detail application, the modulus of elasticity Ec is adjusted to determine the long-term behavior of the structure through the factor ξ. The adjusted modulus of elasticity is referred to as Ec,eff – see Figure 40.
Assuming that the deformation of the element is expressed by strain, it can be written that:
\[\epsilon_{tot} = \epsilon_{0} + \epsilon_{creep} = \epsilon_{0} \cdot (1+\xi)\]
where:
ε0 is a short-term strain (without the influence of creep) and εcreep is a strain caused by creep.
Using Hooke's law, we can write:
\[E_{c,eff} = \frac{f_{c}}{\epsilon_{tot}}\]
Substituting for \(\epsilon_{tot} = \epsilon_{0} \cdot (1+\xi)\) and \(\epsilon_{0} = f_{c} / E_{c}\) we get:
\[E_{c,eff} = \frac{E_{c}}{1+\xi}\]
Sustained load duration for determination of the factor ξ can be set individually for each service long-term combination.
\[ \textsf{\textit{\footnotesize{Fig. 41\qquad Sustained load duration}}}\]
The time-dependent deflections, stresses, and crack widths are then calculated with a modified material model where the effect of compression refinement is taken into account automatically by the nature of the FE analysis. It is, therefore, not necessary to further multiply them by the factor defined in 24.2.4.1.1.
Short-term effects
To conduct short-term verifications, another calculation is performed in which all loads are calculated without the time-dependent factor for sustained loads. Both calculations for long and short-term verifications are depicted in Fig. 40.
Reinforcement
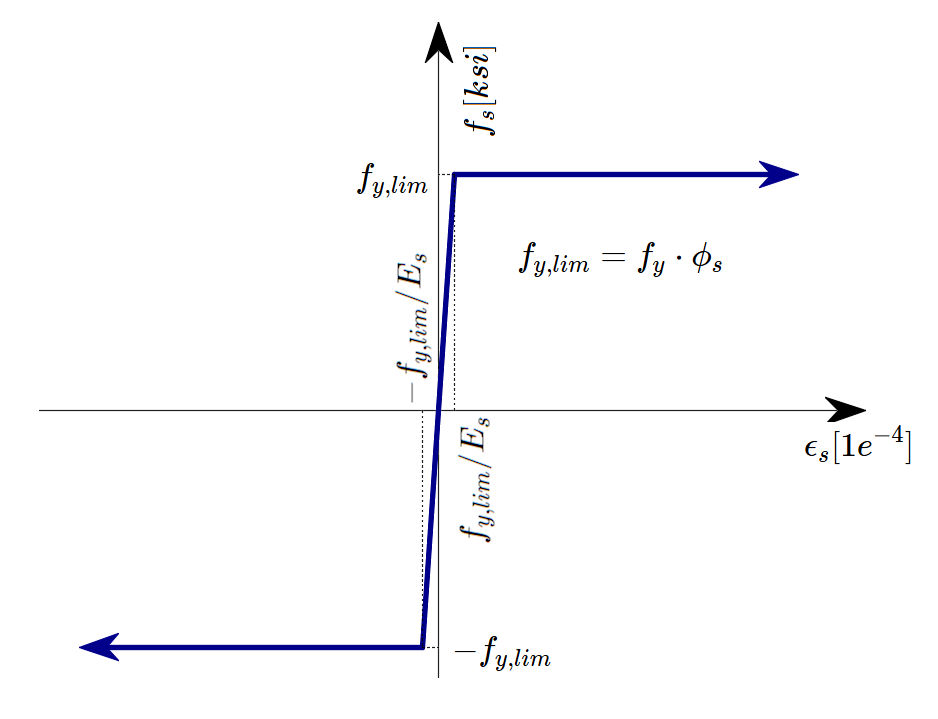
A perfectly elasto-plastic stress-strain diagram with a defined yield point for the non-prestresses reinforcement is considered, see ACI 319-19 CL. 20.2.1. The definition of this diagram only requires the basic properties of the reinforcement to be known – the strength and modulus of elasticity.
The reinforcement stress-strain diagram can be also defined by the user, but in this case, it is impossible to assume the tension stiffening effect (it is impossible to calculate crack width).
\[ \textsf{\textit{\footnotesize{Fig. 42 \qquad Stress-strain diagram of reinforcement}}}\]
where:
Φs is the strength reduction factor for reinforcement. Where the default value is set according to ACI 318-19 Table 24.2.1.
fy is the yield strength of reinforcement
Es modulus of elasticity of reinforcement
10% is selected as the limit strain at which the calculation is stopped. This is considered safe based on ASTM A955/A955M-20c Article 7.
Tension stiffening (Fig. 43) is accounted for automatically by modifying the input stress-strain relationship of the bare reinforcing bar in order to capture the average stiffness of the bars embedded in the concrete (εm).
\[ \textsf{\textit{\footnotesize{Fig. 43\qquad Scheme of tension stiffening.}}}\]
Strength reduction and load factors
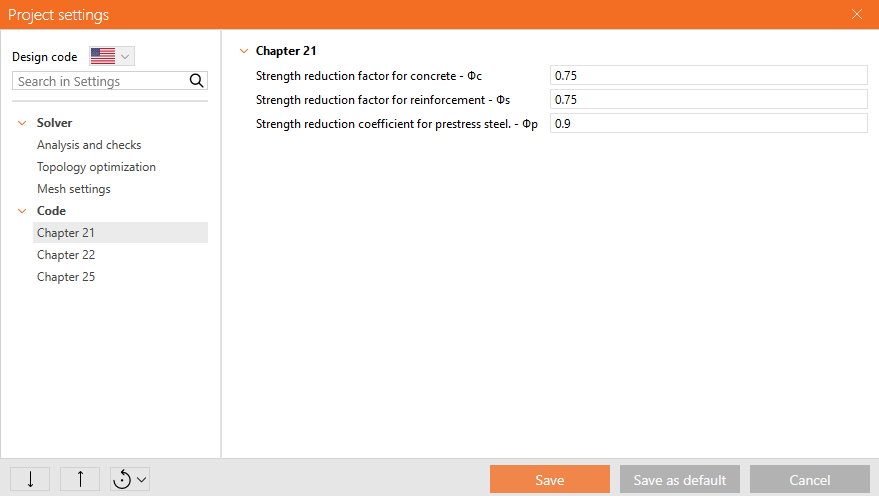
The Compatible Stress Field Method is compliant with modern design codes. As the calculation models only use standard material properties, the partial safety factor format prescribed in the design codes can be applied without any adaptation. In this way, the input loads are factored, and the characteristic material properties are reduced using the respective strength reduction factors, exactly as in conventional concrete analysis.
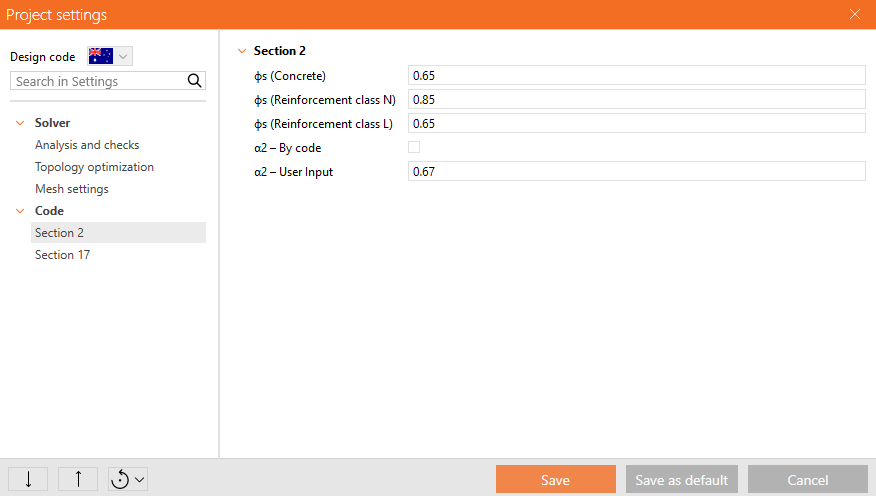
Values of strength reduction factors are prescribed in ACI 318-19 Cl. 21.2. The default values for concrete and reinforcement are chosen based on the assumption that the typical example solved in the application is shear-controlled (based on Table 21.2.1 (b), (f), (g)). However, it is possible to model any type of element. Therefore, if a compression or tension-controlled element is assessed, the user has the option to change the strength reduction factor value in the Preferences.
\[ \textsf{\textit{\footnotesize{Fig. 44\qquad The setting of strength reduction factors in IDEA StatiCa Detail.}}}\]
Load factors for Strength combinations shall be defined according to ACI 318-19 Table 5.3.1.
Except as stated in Chapter 34, service-level load combinations are not defined in ACI 318-19. It is recommended to use combination rules based on Appendix C of ASCE/SEI 7-16. For all templates, load factors are already predefined.
\[ \textsf{\textit{\footnotesize{Fig. 45\qquad The setting of load factors in Idea StatiCa Detail.}}}\]
Strength verifications
The different verifications required by ACI 318-19 are assessed based on the direct results provided by the model. Verifications are carried out for concrete strength, reinforcement strength, and anchorage (bond shear stresses).
The concrete strength in compression is evaluated as the ratio between the maximum principal compressive stress fc (also σ2 in Auxiliary results) obtained from FE analysis and the limit value f'c,lim.
The strength of the reinforcement is evaluated in both tension and compression as the ratio between the stress in the reinforcement at the cracks fs and the specified limit value fy,lim.
The bond shear stress is evaluated independently as the ratio between the bond stress τb calculated by FE analysis and the bond strength fbu.
Although the bond strength is not explicitly defined in ACI 318-19, the calculation of the development length can be found in Section 25.4.2. However, since the bond strength is the basic input for determining the development length, see R25.4.1.1 and ACI Committee 408 1966, the bond strength can be calculated as follows:
Let us assume that if we anchor the reinforcement bar into a concrete block to the development length ld or greater, pulling out the reinforcement will lead to rupture of the reinforcement and not to pulling out of the concrete. This can be written with the following formula.
\[\pi\cdot d_{b} \cdot l_{d} \cdot f_{bu}=f_{y}\cdot A_{s}\]
where:
db is the diameter of the reinforcement bar, ld is the development length, fbu is the bond strength, fy is the yield strength of the reinforcement, and As is the area of the reinforcement rebar.
From the preceding, the formula for calculating bond strength can be easily derived:
\[f_{bu}=\frac{f_{y}\cdot A_{s}}{\pi\cdot d_{b} \cdot l_{d} }\]
The development length ld is then determined according to ACI 318-19 Table 25.4.2.3 as follows:
\[l_{d}=\left( \frac{f_{y}\cdot\psi_{t}\cdot\psi_{e}\cdot\psi_{g}}{C\cdot\lambda\sqrt{f'_{c}}} \right)\cdot d_{b}\]
where:
C = 25 (2.1 for metric) for no. 6 and smaller bars and deformed wires, C = 20 (1.7 for metric) for no. 7 and larger bars, λ = 1.0 for normal weight concrete, ψt, ψe, ψg are determined according to ACI 318-19 Table 25.4.2.3.
Only uncoated or zinc-coated (galvanized) reinforcement is supported, so ψe = 1.0. ψg is automatically determined from the reinforcement grade, and ψt is automatically derived from the position of the reinforcement in the model and from the direction of concreting that can be set in the application for each project item as follows.
\[ \textsf{\textit{\footnotesize{Fig. 46\qquad Direction of concreting}}}\]
These verifications are carried out with respect to the appropriate limit values for the respective parts of the structure (i.e., in spite of having a single grade both for concrete and reinforcement material, the final stress-strain diagrams will differ in each part of the structure due to tension stiffening and compression softening effects).
Total force Ftot and limit force Flim
The total force Ftot is a result of the finite element analysis and can be defined in two ways.
\[F_{tot}=A_{s} \cdot f_{s}\]
where As is the area of the reinforcement bar and fs is the stress in the bar.
Or as a sum of the anchorage force Fa and the bond force Fbond.
\[F_{tot}=F_{a}+F_{bond}\]
where Fa is the actual force in the anchorage spring and Fbond is the bond force that can be obtained by integrating the bond stress τb along the length of reinforcement bar l.
\[F_{bond}=C_{s} \cdot \int_{0}^{l}\tau_{b}\left( x \right)dx\]
Cs is the circumference of the reinforcement bar.
The limit force Flim is the maximum force in the element of the rebar considering the strength of the rebar and also anchoring conditions (bond between concrete and reinforcement and anchorage hooks, loops, etc.).
\[F_{lim}=min\left( F_{lim,bond}+F_{au},F_{u} \right)\]
\[F_{u}=f_{y,lim}\cdot A_{s}\]
\[F_{au}=\beta\cdot f_{y,lim}\cdot A_{s}\]
\[F_{lim,bond}=C_{s}\cdot l \cdot f_{bu}\]
where Cs is the circumference of the reinforcement bar, and l is the length from the beginning of the rebar to the point of interest.
\[ \textsf{\textit{\footnotesize{Fig. 47\qquad Definition of the limit force Flim}}}\]
\[F_{lim,2}=F_{lim,1}+F_{lim,add}\]
where Flim,add is the additional force calculated from the magnitude of the angle between neighboring elements. Flim,2 must be always lower than Fu.
The available anchorage types in CSFM include a straight bar (i.e., no anchor end reduction), 90-degree hook, 180-degree hook, perfect bond, and continuous bar. All these types, along with the respective anchorage coefficients β, are shown in Fig. 48 for longitudinal reinforcement. The values of the adopted anchorage coefficients are derived from the comparison of the equation from section ACI 318-19 25.4.3.1 and equations taken from section ACI 318-19 25.4.2.3. It should be noted that, in spite of the different available options, CSFM distinguishes three types of anchorage ends: (i) no reduction in the anchorage length, (ii) a reduction of 30% of the anchorage length in the case of a normalized anchorage, and (iii) perfect bond.
\[ \textsf{\textit{\footnotesize{Fig. 48\qquad Available anchorage types and respective anchorage coefficients for longitudinal reinforcing bars in CSFM:}}}\]
\[ \textsf{\textit{\footnotesize{(a) straight bar; (b) 90-degree hook; (c) 180-degree hook; (d) perfect bond; (e) continuous bar}}}\]
The anchorage coefficient for stirrups is always - β = 1.0.
In order to comply with ACI, the anchorage spring should be used in the calculation, the anchorage spring is modified by the β coefficient so the user must use one of the available anchorage types when defining the reinforcement start and end conditions.
Bearing and anchorage zones – Partially loaded areas
When designing concrete structures, we meet two large groups of partially loaded areas (PLA) – the first of these comprises bearings, while the other consists of anchoring areas.
According to currently valid standards for the design of reinforced concrete structures ACI 318-19 chap. 22.8, local crushing of concrete and transverse tension forces should be considered for bearings. For a uniformly distributed load on an area, Ac1, the compressive capacity of concrete may be increased by up to two times depending on the design distribution area Ac2. See the ACI 318-19 table 22.8.3.2.
\[ \textsf{\textit{\footnotesize{Fig. 49\qquad Partially loaded areas for bearings according to ACI 318-19}}}\]
For post-tensioned anchorage zones, the following should be followed ACI 318-19 chap. 25.9.
The partially loaded area must be sufficiently reinforced with transverse reinforcement designed to transmit the splitting forces that occur in the area. Without the required transverse reinforcement, it is not possible to consider increasing the compressive capacity of the concrete.
Partially loaded areas in CSFM
\[ \textsf{\textit{\footnotesize{Fig. 50\qquad Fictitious struts with concrete finite element mesh.}}}\]
Using CSFM, it is possible to design and assess reinforced concrete structures while including the influence of the increasing compressive resistance of concrete in partially loaded areas. Because CSFM is a wall (2D) model and the partially loaded areas are a spatial (3D) task, it was necessary to find a solution that combines these two different types of tasks (Fig. 50). If the “partially loaded areas” function is activated, the allowable cone geometry is created according to the ACI (Fig. 49). All geometric collisions are solved fully in 3D for the specified concrete member geometry and the dimensions of each PLA. Subsequently, a computational model of the partially loaded area is created.
\[ \textsf{\textit{\footnotesize{Fig. 51\qquad Allowable cone geometries.}}}\]
The modification of the material model proved to be an unsuitable approach, which was mainly because the mapping of properties to the finite element mesh is problematic. It was determined that an approach independent of the finite element mesh is a more appropriate solution. Absolutely coherent fictitious struts are created for the known compression cone geometry (Fig. 51 and Fig. 52). These struts have identical material properties to the concrete used in the model, including the stress-strain diagram. The shape of the cone determines the direction of the struts, which gradually distributes the load over the PLA to the design distribution area. The area density of the fictitious struts is variable at each part of the cone, and it adds a fictitious concrete area in the load direction. At the level of the loaded area (Ac1), a fictitious area of concrete is added according to the ratio \(\sqrt{A_{c1} \cdot A_{c2}} - A_{real}\) (where Areal is an area of the support assumed in the 2D computational model), and this area decreases linearly to zero towards the design distribution area (Ac2). This solution ensures that the compressive stress in the concrete is constant over the entire cone volume.
\[\rho \left( {\beta ,z} \right) = \left( {\sqrt {\frac{A_{c2}}{A_{c1}}} - \frac{A_{real}}{A_{c1}}} \right)\,\cdot\,\left( {1 - \frac{z}{h}} \right)\,\cdot\,\frac{1}{{\cos \beta }}\]
\[ \textsf{\textit{\footnotesize{Fig. 52\qquad Fictitious struts in the computational model}}}\]
The resistance of the partially loaded area is increased according to the ratio of the design distributed area and the loaded area laid in ACI 318-19 chap. 22.8. It should be remembered that this is a design model that cannot precisely describe the stress state over a partially loaded area whose actual flow is much more complicated. However, this solution allows the correct distribution of load to the whole model while respecting the increased load capacity of the partially loaded area. In addition, it correctly introduces transverse stresses in this area to correctly design reinforcement for splitting forces.
The permissible bearing stress of 0.85fc' is listed in Table 22.8.3.2. The density is limited so that the maximum double capacity given in the formula in Table 22.8.3.2(b) is not exceeded.
For the anchorage zones, PLA is used in the same way as for bearings in the application. That is why the local zones defined in ACI 318-19 chapter 25.9 must checked according to the ACI 318-19 25.9.3 manually. The PLA is, therefore, only used to avoid exceeding strain criterion in the local zone and thus prematurely stopping the calculation. On the other hand, according to ACI 318-19, Cl. 25.9.4.3.1 (b), reinforcement resisting the bursting and spalling in-plane stresses can be directly and advantageously verified in the application.
Serviceability verifications
Serviceability assessments are carried out for stress limitation, crack width, and deflection limits. Stresses are checked in concrete and reinforcement elements according to ACI 318-19 in a similar manner to that specified for the Strength.
Stress limitation
Permissible concrete compressive stresses at service load shall be verified for prestressed members Class U and T. Based on Table R24.5.2.1, there is no stress limitation check required for concrete that is assumed to be cracked. The user needs to set the class of the prestressed member in the design member settings.
\[ \textsf{\textit{\footnotesize{Fig. 53\qquad Prestressed flexural member class selection}}}\]
The allowable compressive stress for members subjected to transient loads is specified by ACI 318-19 24.5.4.1 as 0.6fc'. The compressive stress limit of 0.45fc' was established to decrease the probability of failure of prestressed concrete members due to repeated loads. This limit also seemed reasonable to preclude excessive creep deformation. At higher values of stress, creep strains tend to increase more rapidly as applied stress increases.
The concrete stress in compression is evaluated as the ratio between the maximum principal compressive stress fc = σc2 obtained from FE analysis for serviceability and the limit value, which is set based on Table 24.5.4.1.
\[ \textsf{\textit{\footnotesize{Fig. 54\qquad Concrete compressive stress limits at service loads}}}\]
In the application, Prestress plus sustained load is treated as a Long-term combination, and Prestress plus total load as a Short-term combination.
Deflection
Based on the selected combination type (long-term or short-term), either long-term or short-term deflection is evaluated. The maximum allowable deflection value shall be determined by the user and shall be considered in accordance with ACI 138-19 24.2.
\[ \textsf{\textit{\footnotesize{Fig. 55\qquad Maximum allowable deflection value}}}\]
In the application, it is possible to display the deflections from dead load ΔDL and live load ΔLL separately as well as the total deflection ΔTot (deal+live), all while displaying the deformed shape.
Deflections at trimmed ends cannot be checked.
Crack width
Crack widths and crack orientations are calculated for serviceability short-term or long-term combinations. Since ACI does not directly prescribe limiting crack widths, the user must specify a limiting crack width wlim.
The verifications are presented as follows:
\[\frac{w}{w_{lim}}\]
where:
w short- or long-term crack width calculated by FE analysis,
wlim limit value of the crack width defined by the user.
The method of calculating crack widths used in the application, also described in more detail in this document, is in accordance with ACI 224R-01. It is, therefore, possible to use ACI 224R-01 Table 4.1 to determine the limiting value of crack widths.
\[ \textsf{\textit{\footnotesize{Fig. 56\qquad Reasonable crack widths for reinforced concrete under service load}}}\]
There are two ways of computing crack widths (stabilized and non-stabilized cracking). In the general case (stabilized cracking), the crack width is calculated by integrating the strains on 1D elements of reinforcing bars. The crack direction is then calculated from the three closest (from the center of the given 1D finite element of reinforcement) integration points of 2D concrete elements. While this approach to calculating the crack directions does not correspond to the real position of the cracks, it still provides representative values that lead to crack width results that can be compared to code-required crack width values at the position of the reinforcing bar.
Structural verifications according to Australian standard AS 3600 (2018)
Assessment of the structure using the CSFM is performed by two different analyses: one for serviceability, and one for strength load combinations. The serviceability analysis assumes that the behavior under factored loads is satisfactory, and the yield conditions of the material will not be reached at serviceability load levels. This approach enables the use of simplified constitutive models (with a linear branch of concrete stress-strain diagram) for serviceability analysis to enhance numerical stability and calculation speed.
The CSFM is a structural analysis method that satisfies the general rules in Chapters 6.1.1 and 6.1.2 and is defined as (f) non-linear stress analysis in Chapter 6.1.3 - further in Chapter 6.6.
The analysis by CSFM takes into account all relevant non-linear and inelastic effects (except shrinkage) defined in 6.6.3.
In order to satisfy the requirements in Sections 6.6.4 and 6.6.5 - more can be found in AS3600:2018 Sup 1:2022 Section C6.6 - verification and validations of the method were done at various universities. Individual articles summarizing the results of verification and validation can be found at the following link.
Since IDEA StatiCa Detail is a practical design program, factored characteristic compressive cylinder strength at 28 days f'c is used for calculations, as is described in the next chapter.
Material models (AS 3600)
Concrete - Strength
The concrete model implemented for strength calculations in CSFM is based on the parabolic-plastic stress-strain curve. The tensile strength is neglected, as it is in classic reinforced concrete design.
\[ \textsf{\textit{\footnotesize{Fig. 57\qquad The stress-strain diagram of concrete for Strength analysis}}}\]
The implementation of CSFM in IDEA StatiCa Detail does not consider an explicit failure criterion in terms of strains for concrete in compression (i.e., after the peak stress is reached, it considers a plastic branch with εc0 in maximum value 5%, while AS 3600 Cl. 8.3.1 assumes ultimate strain of less than 0.3%). This simplification does not allow the deformation capacity of structures failing in compression to be verified. However, the strength is properly predicted when, in addition to the factor of cracked concrete (kc2 defined in (Fig. 58)), the increase in the brittleness of concrete as its strength rises is considered by means of the \(\eta_{fc}\) reduction factor defined in fib Model Code 2010 as follows:
\[f'_{c,lim}=\alpha_{2}\cdot\phi_{s}\cdot \beta \cdot \eta_{fc}\cdot f'_{c}\]
\[{\eta _{fc}} = {\left( {\frac{{30}}{{{f'_{c}}}}} \right)^{\frac{1}{3}}} \le 1\]
where:
α2 is the reduction factor of concrete compressive strength defined in AS 3600 Cl. 8.3.1
When using a parabola-rectangle stress-strain diagram, it is necessary to reduce the maximum compressive stress by this factor. This averages the stress distribution in the compression zone in such a way that the resulting compressive strength is less than or equal to the compressive strength calculated using a stress-strain diagram with a decreasing plastic branch. An analogous approach is defined for the Rectangular stress block in Chapter 8.1.3.
Φs is the stress reduction factor for concrete. The default value is set according to AS 3600 Table 2.2.3.
β is the reduction factor due to the presence of transverse cracking (also referred to as kc2 in this text)
f'c is the concrete cylinder strength (in MPa for the definition of \( \eta_{fc} \)).
\[ \textsf{\textit{\footnotesize{Fig. 58\qquad The compression softening law.}}}\]
β is a reduction factor based on the same principles as an effective compressive strength factor defined in Chapter 2.2.3. The literature against which this factor is determined can be found (including the context of the AS3600 standard) in AS3600:2018 Sup 1:2022 CL. C2.2.3.
Concrete – Serviceability
The serviceability analysis contains certain simplifications of the constitutive models which are used for strength analysis. The plastic branch of the stress-strain curve of concrete in compression is disregarded, while the elastic branch is linear and infinite. Compression softening law is not considered. These simplifications enhance the numerical stability and calculation speed and do not reduce the generality of the solution as long as the resultant material stress limits at serviceability are clearly below their yielding points (as required by AS3600). Therefore, the simplified models used for serviceability are only valid if all verification requirements are fulfilled.
\[ \textsf{\textit{\footnotesize{Fig. 59\qquad Concrete stress-strain diagrams implemented for serviceability analysis: short- and long-term verifications.}}}\]
Long-term effects
In serviceability analysis, the long-term effects of concrete are considered using the Design creep coefficient according to AS 3600 CL 3.1.8 (φcc, taken as a value of 2.5 by default), which modifies the secant modulus of elasticity of concrete (Ec) as follows:
\[E_{c,eff} = \frac{E_{c}}{1+\varphi_{cc}}\]
Load increments are sequentially calculated in the order: Prestressing - Permanent - Imposed, using the appropriate effective modulus of elasticity for each increment as shown in Fig. 59. Creep factors are defined by the user in material properties and shall be calculated according to AS 3600 CL 3.1.8.3
\[ \textsf{\textit{\footnotesize{Fig. 60\qquad Definition of the design creep factor}}}\]
Short-term effects
To conduct short-term verifications, another calculation is performed in which all loads are calculated without the time-dependent factor for sustained loads. Both calculations for long and short-term verifications are depicted in Fig. 59.
Reinforcement
A perfectly elasto-plastic stress-strain diagram with a defined yield point for the non-prestresses reinforcement is considered, see AS 3600 Section 3.2. The definition of this diagram only requires the basic properties of the reinforcement to be known – the strength and modulus of elasticity.
The reinforcement stress-strain diagram can be also defined by the user, but in this case, it is impossible to assume the tension stiffening effect (it is impossible to calculate crack width).
\[ \textsf{\textit{\footnotesize{Fig. 61 \qquad Stress-strain diagram of reinforcement}}}\]
where:
Φs is the strength reduction factor for reinforcement. Where the default value is set according to AS 3600 Table 2.2.3.
fy is the yield strength of reinforcement
Es modulus of elasticity of reinforcement
Tension stiffening (Fig. 62) is accounted for automatically by modifying the input stress-strain relationship of the bare reinforcing bar in order to capture the average stiffness of the bars embedded in the concrete (εm).
\[ \textsf{\textit{\footnotesize{Fig. 62\qquad Scheme of tension stiffening.}}}\]
Stress reduction and load factors
The Compatible Stress Field Method is compliant with modern design codes. As the calculation models only use standard material properties, the partial safety factor format prescribed in the design codes can be applied without any adaptation. In this way, the input loads are factored, and the characteristic material properties are reduced using the respective stress reduction factors, exactly as in conventional concrete analysis.
Values of stress reduction factors are prescribed in AUS 3600 Cl. 2.2.3. The default values for concrete and reinforcement are set according to Table 2.2.3
\[ \textsf{\textit{\footnotesize{Fig. 63\qquad The setting of stress reduction factors in IDEA StatiCa Detail.}}}\]
Load factors for Strength combinations shall be defined according to AS 3600 Cl. 4.2.2. Load factors for Serviceability combinations shall be determined according to Table 4.1. For all templates, load factors are already predefined.
\[ \textsf{\textit{\footnotesize{Fig. 64\qquad The setting of load factors in Idea StatiCa Detail.}}}\]
Strength and anchorage verifications
The different verifications required by AS 3600 are assessed based on the direct results provided by the model. Verifications are carried out for concrete strength, reinforcement strength, and anchorage (bond shear stresses).
The concrete strength in compression is evaluated as the ratio between the maximum principal compressive stress fc (also σ2 in Auxiliary results) obtained from FE analysis and the limit value f'c,lim.
The strength of the reinforcement is evaluated in both tension and compression as the ratio between the stress in the reinforcement at the cracks fs and the specified limit value fsy,lim.
The bond shear stress is evaluated independently as the ratio between the bond stress τb calculated by FE analysis and the design ultimate bond stress fbu.
For the determination of the design ultimate bond stress fbu, the formula C13.1.2.2 defined in AS3600:2018 Sup 1:2022 is considered in the application.
\[f_{bu}=\frac{k_{2}}{k_{1} \cdot k_{3}} \cdot (0.5 \cdot \sqrt{f'_{c}})\]
Where f'c ≤ 65 MPa (in the formula is in MPa), and k factors are determined from AS 3600 Cl. 13.1.2.2 as follows:
k3 = 0.7 (conservative value for all reinforcement)
k2 = (132 - db) / 100 (db is diameret of rebar in millimeters)
= 1.3 for a horizontal bar with more than 300 mm of concrete cast below the bar, or 1.0 otherwise
k1 is automatically derived from the position of the reinforcement in the model and from the direction of concreting that can be set in the application for each project item as follows.
\[ \textsf{\textit{\footnotesize{Fig. 65\qquad Direction of concreting}}}\]
The basic development length Lsy,tb is calculated according to formula 13.1.2.2 in AS 3600 as follows:
\[L_{sy,tb}=\frac{0.5\cdot k_{1}\cdot k_{3}\cdot f_{sy}\cdot d_{b}}{k_{2}\cdot \sqrt{f'_{c}}}\ge 29 \cdot k_{1}\cdot d_{b}\]
As can be seen in the formula, the basic development length Lsy,tb is limited from below, and therefore the design ultimate bond stress fbu must be limited in the same way in the application, so the following applies:
\[f_{bu}\le \frac{f_{sy}}{116 \cdot k_{1}} \]
Where fsy is in MPa.
The derivation of the fbu limitation is as follows:
\[f_{bu}= \frac{f_{sy}\cdot A_{s}}{ \pi \cdot d_{b} \cdot L_{sy,tb}}=\frac{f_{sy}\cdot \pi \cdot d_{b}^{2}}{4 \cdot \pi \cdot d_{b} \cdot 29 \cdot k{1} \cdot d_{b}} =\frac{f_{sy}}{116 \cdot k_{1}} \]
Total force Ftot and limit force Flim
The total force Ftot is a result of the finite element analysis and can be defined in two ways.
\[F_{tot}=A_{s} \cdot f_{s}\]
where As is the area of the reinforcement bar and fs is the stress in the bar.
Or as a sum of the anchorage force Fa and the bond force Fbond.
\[F_{tot}=F_{a}+F_{bond}\]
where Fa is the actual force in the anchorage spring and Fbond is the bond force that can be obtained by integrating the bond stress τb along the length of reinforcement bar l.
\[F_{bond}=C_{s} \cdot \int_{0}^{l}\tau_{b}\left( x \right)dx\]
Cs is the circumference of the reinforcement bar.
The limit force Flim is the maximum force in the element of the rebar considering the strength of the rebar and also anchoring conditions (bond between concrete and reinforcement and anchorage hooks, loops, etc.).
\[F_{lim}=min\left( F_{lim,bond}+F_{au},F_{u} \right)\]
\[F_{u}=f_{y,lim}\cdot A_{s}\]
\[F_{au}=\beta\cdot f_{y,lim}\cdot A_{s}\]
\[F_{lim,bond}=C_{s}\cdot l \cdot f_{bu}\]
where Cs is the circumference of the reinforcement bar, and l is the length from the beginning of the rebar to the point of interest.
\[ \textsf{\textit{\footnotesize{Fig. 66\qquad Definition of the limit force Flim}}}\]
\[F_{lim,2}=F_{lim,1}+F_{lim,add}\]
where Flim,add is the additional force calculated from the magnitude of the angle between neighboring elements. Flim,2 must be always lower than Fu.
The available anchorage types in CSFM include a straight bar (i.e., no anchor end reduction), Standard cog, Standard hook, perfect bond, and continuous bar. All these types, along with the respective anchorage coefficients β, are shown in Fig. 67 for longitudinal reinforcement. The values of the adopted anchorage coefficients are derived from AS 3600 Cl. 13.1.2. It should be noted that, CSFM distinguishes three types of anchorage ends: (i) no reduction in the anchorage length, (ii) a reduction of 50% of the anchorage length in the case of a normalized anchorage, and (iii) perfect bond.
\[ \textsf{\textit{\footnotesize{Fig. 67\qquad Available anchorage types and respective anchorage coefficients for longitudinal reinforcing bars in CSFM:}}}\]
\[ \textsf{\textit{\footnotesize{(a) straight bar; (b) Standard cog; (c) Standard hook; (d) perfect bond; (e) continuous bar}}}\]
The anchorage coefficient for stirrups is always - β = 1.0.
In order to comply with AS 3600, the anchorage spring should be used in the calculation, the anchorage spring is modified by the β coefficient so the user must use one of the available anchorage types when defining the reinforcement start and end conditions.
Serviceability checks
Serviceability assessments are carried out for crack width and deflection limits.
Deflection
Based on the selected combination type (long-term or short-term), either long-term or short-term deflection is evaluated. The maximum allowable deflection value shall be determined by the user and shall be considered in accordance with AS 3600 Cl. 2.3.2.
\[ \textsf{\textit{\footnotesize{Fig. 68\qquad Maximum allowable deflection values}}}\]
In the application, it is possible to display the deflections from permanent load ΔPL and imposed load ΔIL separately as well as the total deflection ΔTot (permanent + imposed), all while displaying the deformed shape.
Deflections at trimmed ends cannot be checked.
Crack width
Crack widths and crack orientations are calculated for serviceability short-term or long-term combinations. The method of direct calculation of crack widths in the application is in accordance with (based on) the method given in AS 3600 8.6.2.3.
The verifications are presented as follows:
\[\frac{w}{w_{lim}}\]
where:
w short- or long-term crack width calculated by FE analysis,
wlim limit value of the crack width defined by the user.
Recommended maximum crack widths can be found in AS3600:2018 Sup 1:2022 Table C2.3.3.1.
\[ \textsf{\textit{\footnotesize{Fig. 69\qquad Recommended final design crack widths}}}\]
Alternatively, according to AS3600:2018 Sup 1:2022 Cl. C8.6.1 - For structures subjected to the long-term service loads, recommended values for wlim are as follows:
\[ \textsf{\textit{\footnotesize{Fig. 70\qquad Recommended values for the limit value of the crack width for beams based on exposure classes}}}\]
There are two ways of computing crack widths (stabilized and non-stabilized cracking). In the general case (stabilized cracking), the crack width is calculated by integrating the strains on 1D elements of reinforcing bars. The crack direction is then calculated from the three closest (from the center of the given 1D finite element of reinforcement) integration points of 2D concrete elements. While this approach to calculating the crack directions does not correspond to the real position of the cracks, it still provides representative values that lead to crack width results that can be compared to code-required crack width values at the position of the reinforcing bar.
Prestressing - model description
Introduction and material models
The Compatible Stress Field Method (CSFM) is a computational method based on 2D plane stresses in which concrete is modelled using 2D finite elements to which 1D reinforcement elements are connected by constraints. There can be also special types of 1D elements representing bonded prestressing reinforcement added to the model, which can be modelled as pre-tensioned and post-tensioned.
Prestressed reinforcement is modelled similarly to conventional reinforcement using linear elements transmitting the axial force. Each individual prestressed reinforcement element is characterised by its area and material properties. These properties are given by the characteristic material curve according to the used code (EN 1992-1-1, ACI 318-19, etc.)
EUROCODE
Stress-strain diagram of prestressing reinforcement: a) Stress-strain diagram as defined in EN 1992-1-1; b) initial strain for pre-tensioned reinforcement
ACI
Stress-strain diagram of prestressing reinforcement: a) Stress-strain diagram; b) initial strain for pre-tensioned reinforcement
The reinforcement elements are connected by a bond model to the 2D elements of the concrete model in the same way as the classical concrete reinforcement.
- Read Finite element types
The bond model elements allow the relative deformation of the prestressed reinforcement and the concrete with appropriate nonlinear characteristics. This correctly models the cohesion of the reinforcement with the concrete and also the anchorage model of the pre-tensioned reinforcement. The end modifications of the post-tensioned reinforcement e.g., the anchor plate, are modelled by an element with a stiffness corresponding to the anchor at the end of the prestressing reinforcement, and the end prestressing force is applied as an area load into the concrete model over an area of the anchoring plate size. The model cannot correctly describe the local triaxial stress in the sub-anchor region, and this region must be considered separately.
The tension stiffening of the reinforcement due to concrete interactions is not considered in the prestressing reinforcement because the concrete in the vicinity of the prestressing reinforcement is assumed to be in compression.
Pre-tensioned reinforcement
The pre-tensioned reinforcement is prestressed before the casting of the element, the prestressing reinforcement is almost always routed as a straight line, therefore no frictional prestressing losses occur. Once the required concrete strength is reached, the reinforcement is released from the anchor blocks, thus activating the prestressed reinforcement and transferring the forces from the reinforcement to the concrete. This effect is physically equivalent to the subcooling of the reinforcement and is modelled by an initial strain similar to that of thermal loading. This gives a stress-strain diagram of prestressed reinforcement as shown in the figure above in b). The computational model automatically calculates the deformation response of the structure to the applied prestress, and therefore directly determines the prestress losses by elastic strain of the element.
Since the prestressing force is known, and therefore also the prestressing stress σpmo, the material diagram of the reinforcement is used for the stress dependence on the deformation and can be written as:
\[{{σ}_{p}}=~{{f}}({{ε}}-{{ε}_{0}})\]
Assuming that the prestress in the reinforcement is lower than the yield strength (i.e. the conditions defined in EN 1992-1-1, chapter 5.10.3 are fulfilled), the initial deformation can also be calculated as:
\[{{ε}_{0}}=\frac{{{σ}_{pm0}}}{{{E}_{p}}}\]
ε0 - initial strain from prestressing
σpm0 - stress just before release
Ep - modulus of elasticity for restressing reinforcement
Pre-tensioned reinforcement is specific in that its anchoring of the ends is accomplished by several different mechanisms - adhesion of the reinforcement and concrete at the molecular level, the friction generated at the interface between the surface of the reinforcement and concrete, mechanical pushing of the spiral reinforcement into the concrete, and an increase in the diameter of the prestressing reinforcement known as the wedge mechanism or Hoyer effect. The aforementioned effects are included in the CSFM computational model by modifying the properties of the anchorage model in the end region of the pre-tensioned reinforcement.
Interaction of pre-tensioned reinforcement and concrete: a) spiral reinforcement pushing into concrete; b) Hoyer effect
Post-tensioned reinforcement
The post-tensioned reinforcement is prestressed after the structure has been cast. The prestressing device is supported directly in the structure, thus eliminating the losses due to the elastic strain of the structure from prestressing. Once the desired prestressing force is achieved, the reinforcement is anchored, and then the cable ducts are grouted, thereby achieving a reinforcement bond with the structure. When modelling post-tensioned reinforcement, the calculation is therefore divided into several loading steps - prestressing, application of other permanent loads and application of variable loads.
Finite-element concrete mesh with attached 1D prestressing reinforcement elements:
Load step "prestressing"
When prestressing the reinforcement, the stiffness of the reinforcement is not incorporated into the stiffness of the structure. In this loading step, the stiffness of the linear element is not considered in the model, the reinforcement elements are replaced by a substitute load corresponding to the prestressing stress and reinforcement area as shown in the figure above. After reaching the full load from the prestress and convergence of this loading step, the deformation of the specific linear element is read off, based on the deformation the initial strain ε0 of the individual linear elements of the prestressing reinforcement is determined.
The prestressing stress can be defined manually along the length of the reinforcement or calculated automatically based on the geometry of the reinforcement. If the automatic calculation of losses is chosen, frictional loss (according to EN 1992-1-1, 5.10.5.2, or ACI 318-19, 20.3.2) and reinforcement slip (pressing of anchor wedges) during anchoring are considered. As all prestressing reinforcement is applied in one step, loss by successive prestressing is not considered.
Subsequent loading steps with prestressing reinforcement engaged
In the following loading steps (application of other permanent and variable loads) the same procedure is followed as for pre-tensioned reinforcement. The full stiffness of the prestressed reinforcement is considered, the bond between the reinforcement and the surrounding concrete is considered, and the stress-strain diagram of the prestressed reinforcement is modified by the initial strain ε0. This strain is different for each element and was obtained from the previous loading step "prestressing". Due to the bond of the reinforcement and the concrete, the change of prestress due to the elastic deformation of the structure from the external load is correctly considered in the model.
References
ACI Committee 318. 2019. Building Code Requirements for Structural Concrete (ACI 318-19) and Commentary. Farmington Hills, MI: American Concrete Institute.
Alvarez, Manuel. 1998. Einfluss des Verbundverhaltens auf das Verformungsvermögen von Stahlbeton. IBK Bericht 236. Basel: Institut für Baustatik und Konstruktion, ETH Zurich, Birkhäuser Verlag.
Beeby, A. W. 1979. “The Prediction of Crack Widths in Hardened Concrete.” The Structural Engineer 57A (1): 9–17.
Broms, Bengt B. 1965. “Crack Width and Crack Spacing In Reinforced Concrete Members.” ACI Journal Proceedings 62 (10): 1237–56. https://doi.org/10.14359/7742.
Burns, C.. 2012. “Serviceability Analysis of Reinforced Concrete Members Based on the Tension Chord Model.” IBK Report Nr. 342, Zurich, Switzerland: ETH Zurich.
Crisfield, M. A. 1997. Non-Linear Finite Element Analysis of Solids and Structures. Wiley.
European Committee for Standardization (CEN). 2015. 1 Eurocode 2: Design of concrete structures - Part 1-1: General rules and rules for buildings. Brussels: CEN, 2005.
Fernández Ruiz, M., and A. Muttoni. 2007. “On Development of Suitable Stress Fields for Structural Concrete.” ACI Structural Journal 104 (4): 495–502.
Kaufmann, W., J. Mata-Falcón, M. Weber, T. Galkovski, D. Thong Tran, J. Kabelac, M. Konecny, J. Navratil, M. Cihal, and P. Komarkova. 2020. “Compatible Stress Field Design Of Structural Concrete. Berlin, Germany.”AZ Druck und Datentechnik GmbH, ISBN 978-3-906916-95-8.
Kaufmann, W., and P. Marti. 1998. “Structural Concrete: Cracked Membrane Model.” Journal of Structural Engineering 124 (12): 1467–75. https://doi.org/10.1061/(ASCE)0733-9445(1998)124:12(1467).
Kaufmann, W.. 1998. “Strength and Deformations of Structural Concrete Subjected to In-Plane Shear and Normal Forces.” Doctoral dissertation, Basel: Institut für Baustatik und Konstruktion, ETH Zürich. https://doi.org/10.1007/978-3-0348-7612-4.
Konečný, M., J. Kabeláč, and J. Navrátil. 2017. Use of Topology Optimization in Concrete Reinforcement Design. 24. Czech Concrete Days (2017). ČBS ČSSI. https://resources.ideastatica.com/Content/06_Detail/Verification/Articles/Topology_optimization_US.pdf.
Marti, P. 1985. “Truss Models in Detailing.” Concrete International 7 (12): 66–73.
Marti, P. 2013. Theory of Structures: Fundamentals, Framed Structures, Plates and Shells. First edition. Berlin, Germany: Wiley Ernst & Sohn.
http://sfx.ethz.ch/sfx_locater?sid=ALEPH:EBI01&genre=book&isbn=9783433029916.
Marti, P., M.Alvarez, W. Kaufmann, and V. Sigrist. 1998. “Tension Chord Model for Structural Concrete.” Structural Engineering International 8 (4): 287–298.
https://doi.org/10.2749/101686698780488875.
Mata-Falcón, J. 2015. “Serviceability and Ultimate Behaviour of Dapped-End Beams (In Spanish: Estudio Del Comportamiento En Servicio y Rotura de Los Apoyos a Media Madera).” PhD thesis, Valencia: Universitat Politècnica de València.
Meier, H. 1983. “Berücksichtigung Des Wirklichkeitsnahen Werkstoffverhaltens Beim Standsicherheitsnachweis Turmartiger Stahlbetonbauwerke.” Institut für Massivbau, Universität Stuttgart.
Navrátil, J., P. Ševčík, L. Michalčík, P. Foltyn, and J. Kabeláč. 2017. A Solution for Walls and Details of Concrete Structures. 24. Czech Concrete Days.
Schlaich, J., K. Schäfer, and M. Jennewein. 1987a. “Toward a Consistent Design of Structural Concrete.” PCI Journal 32 (3): 74–150.
Standards Australia. 2018. Concrete Structures (AS 3600:2018). Sydney, NSW: Standards Australia.
Standards Australia. 2022. Concrete Structures – Commentary (Supplement 1 to AS 3600:2018). Sydney, NSW: Standards Australia.
Vecchio, F.J., and M.P. Collins. 1986. “The Modified Compression Field Theory for Reinforced Concrete Elements Subjected to Shear.” ACI Journal 83 (2): 219–31.


